

I just love crafting up these cute little top hats. You can make them in just an hour or two. Lets take a look at how to design a digital, hybrid top hat and the next time, we'll do a traditional one. We've got a full tutorial as well as a couple versions of the free template. This way you can create a digital hybrid top hat or a traditional one, too.
I made this hat with all scraps and a cereal box! If you want to see more check out the blog entry by clicking on the image. I had a few requests to make a tutorial so here we are.
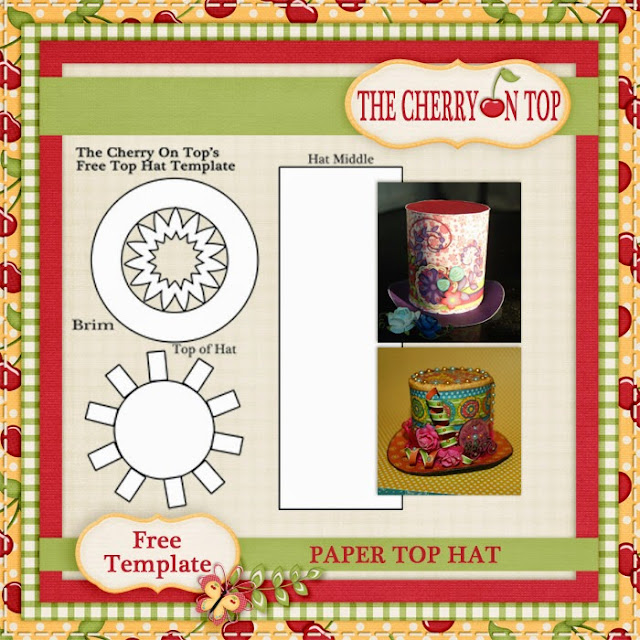
Today, we're doing it Digi style! Download this simple template, insert your favourite background papers and embellish if you choose either digitally or traditionally. Let us show you how.
This is a screen shot of the template clipped in with some fun papers from Eqr Aveziur's kit, Among Flowers. The kit is just ga ga gorgeous.

If you've never worked with a template before, it's super simple. You will need a software program that allows this. The one here is Photo Shop Elements. Photo Shop works along with many other programs, too. Just Google using a template in .... whatever software system you have and find a tutorial that works for your software.

I've cropped these strips of solid colour paper and added them to the cylindrical part of the hat and used some shadows to give it some depth.

Then I turned my project so that I could add the embellishments electronically. It's all goodies from Among Flowers. Pretty amazing, eh?
You will need:
software program and or printer
card stock
scissors or cutting device
adhesive
I printed out both the basic template as well as the template all dressed up on good quality card stock. Of course you can print them out the template on printed paper, too.


This part is a bit tricky, but I found a really easy way to do it. First, snip all of the triangle's left side around the entire pattern.

Then go back and do the left. It will be done in a snap. If you have a small scissor it's best.

Here are all of your pieces. I have to say, it was very difficult getting this template just right. I tweaked and tweaked and it was always a touch different. If you're finding the top of the hat too difficult to fit in the middle, then I suggest cutting off the strips by just cutting out the centre of the circle and stick it on the top of the hat. It's what I have to do too, for a couple of hats.

Choose how high you would like your hat. Keeping that in mind when you design it digitally and of course, making adjustments to the template. I taped the inside of my hat when I got it to fit just right over the top of the teeth to the brim of the hat. If you look carefully at the image below you can see this step. Then I added a piece of double sided tape right up to the edge and adhered it.

Flip up all of the teeth. You can either add a drop of glue to each tooth or a tiny glue dot. I use both methods on different hats and materials. If your paper is not very rigid, then go with the glue. Glue allows for more freedom and mistakes. Just remember to let it dry.

I took my scissors and pressed up each tooth against the inside of the hat. It's not a disaster if a couple of teeth don't stick.

Use some ink around the edges of the pieces if you like. I cut off all of those tabs on the top the hate because it just wasn't fitting perfectly.

Use glue around the edge of the top of the middle part of the hat or around the edge of the top of the hat and gently add it to the top. I placed a light spool of ribbon on top until it was dry. It comes out nice and flat that way. If you have a little over the edge, no worry. Take some really good, sharp scissors and carefully cut off the excess, once it's dry.

I like curling up the sides of the hat just a touch.

That's it! Make yourself a fun, paper top hat in about an hour, digitally.

We'll be back with another version using the templates in a traditional fashion and an entirely different top hat.
Here is your free template. Good luck and feel free to show us what you make either here or on our Facebook Page.
Feel free to school through our blog and find many more freebies, fun projects and inspiration.
Happy crafting!
No comments:
Post a Comment