Showing posts with label PattyB Scraps. Show all posts

Thursday, May 12, 2016

Throw Back Thursday With THREE Freebies

Welcome to The Cherry On Top's Throw Back Thursday.

How's that for a throw back photo?  Ha!  I'm the little one with my mom and two older brothers on our one and only family vacation.  I can't say I remember much, but I've got a stuffed animal AND a box of Cracker Jacks, so it must have been good!  Hehehe....

Today, I'm bringing back Surf, Sand and The 4th from the Digital Scrapbooking Studio.  It was an enormous store wide collection from over a dozen designers and some of the collection is still available.  I've made two frame frickies available again and as a super special treat, I'm even bringing back the template from that blog and you can get the link in this blog for it.  Keep scrolling to get the three freebies.


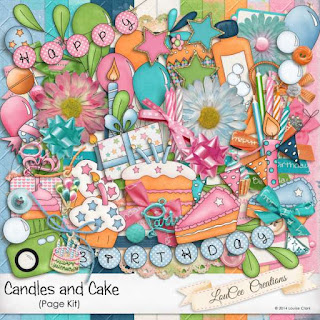
This was LouCee Creations portion of the collection.  What a super embodiment of the beach. 

 free frickie

This image is linked up to the blog where you can find the download.


 free frickie

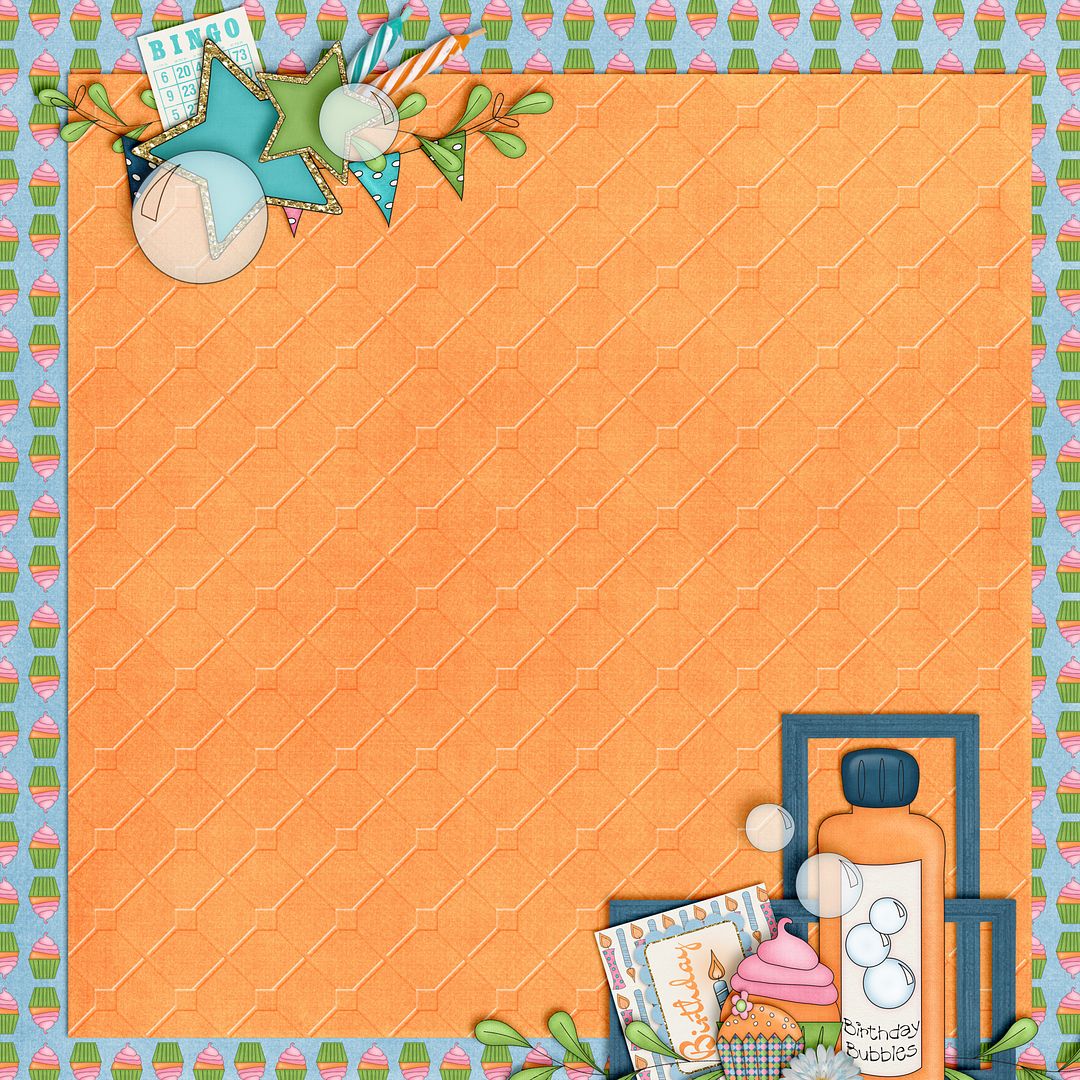
Here's another example of a frickie and it is quite a doozy! A frickie is a quick page and or a frame, depending on how you use it and if it comes from The Cherry, it's free. Hence, a frickie.  Hehehe...

I really love the way it turned out and that you can use more than one photo if you like.  You could always place a lovely paper and elements in the two smaller squares if you have no photos for them.  PattyB Scraps did such a smashing job on this collection.

 free frickie

This image is also linked up to the blog where you can get the link for the free frickie.

 free frickie

Ah!  Here is A-Manda Creation's portion of Surf, Sand and The 4th.  Isn't it just stunning?  This is also a look at the free template that we've made live again for a limited time.  Keep reading to get the link for it.

 free template

This image has the link for the free download.


 free template

If you are all about the free stuff, then The Cherry is the place to be.  I've still got our Dog Daze kit up for free.  It will be free for just a couple more days and then it will be gone.  Grab it while you can.  This next preview is the new, coordinating freebie for Dog Daze.  You can find it in our new group page on Facebook.  You may have to scroll a bit to get to it and you will find the link in the comments. I'd love for you to become a member of our group.  I'll be posting challenges, sketches, inspiration, tutorials, exclusive group freebies as well as games, links for more freebies and YOU can post your lovely layouts and other crafty projects there, too!

Click on this preview to get to our group and join us in daily shenanigans!

 free clusters

Here's a look at the kit.  It's on two different blogs and there is also a coordinating quick page on another entry.  This is no longer free.


 free collection

Here is some scrappy inspiration with our new, free collection, Dog Daze.  This one is from me, using a template from Brenian Designs.


 Bren's shop


This lovely layout is from my scrappy sister, Dana.

 free collection

Thank you so much for giving The Cherry some of your precious time.  If you download anything from us, remember it is for Personal Use ONLY and leave us some love as a way to say thanks via a comment, share or +.

Scrap something lovely, share it in our group on Facebook and join us for a laugh.

See you tomorrow for Freebie Friday.


Saturday, November 7, 2015

PattyB Scraps, DSD And Freebies

Welcome to The Cherry On Top.

Digital Scrapbooking Week is winding down and I'm going to need a vacation.  Hehehe...  This is my second to last freebie and it's coming from PattyB Scraps.  Keep scrolling to see what you can do with the freebie, see some great deals in Patty's shops, grab your freebie and see what other freebies you have missed.

 dnd


I love scrapping Christmas and winter.  I don't have too many winter photos due to the lame landscape in East Flanders, but Christmas is no problem.  This kit from Over The Fence Designs has the sweetest elements in it.  Santa, the nutcracker, Rudolph and so much more.

Don't mind JJ's lack of enthusiasm with his gift.  Hehehe...Liam was suer excited to get the same gift in a different colour.  At least if his breaks, there's another.


Another way you can use our freebies is to simply insert a huge picture that you love and you could use a tiny, thin border or background if you like.  Now, these gifts were a sure hit for both boys!


This is your free frame thingy.  Hehehe...I want to call it a template because you can insert any paper or background you'd like for the basic shape, but it's just one shape in a frame form.  So, it's a temp-frame or a Frame-plet.  Hehehe...

 freebie

Merry Christmas will on in a Falsh Sale for just $1.  I know, right?!  But, only on November 7th!  Along with two other lovely kit.  Those owls and that colour palette.  Just love it!  These amazing 6 kits will be just $1 on November 7th at the Digital Scrapbooking Studio.

 dss


PattyB also has a font challenge going on at Go Digital Scrapbooking where you get a lovely, free mini for playing along.  Click on either image to get there.

 GDS

 GDS

So, what have you missed from The Cherry On Top so far?

A free mini kit.
 tcot

A free template.
 TCOT

A free frickie.

And a free frame cluster.
 tcot

This template will be live on the blog Sunday.  Don't miss it!

All of our freebies are for  Personal Use Only.

Thanks so much for making The Cherry a part of your day!


Wednesday, September 9, 2015

Hybrid Mini And Bow Tutorial

Howdy, Happy Scrappers!

Welcome to yet another scrap edition of The Cherry On Top.

Today, we've got layout inspiration galore, a hybrid mini album idea that's basic and easy as well as instructions on how to make a pretty bow.

The family went to the south of France this summer on the invitation of our lovely neighbour.  They let us lodge in their gorgeous 18th century home in Serdinya.

As a way to say thank you, I designed these 10 digital pages, backed them with traditional scrap paper and inserted them in a typical 6x6 album that you can get nearly anywhere.  (Here in Belgium, I often find them at the Boekenvoordeel.)

I'll show off each digital page for you.  I used several different kits from the Studio's huge collaboration, Surf, Sand and the 4th.  The colour palette is all the same and if you noticed, the colours from the French flag.  I just so happened to have some scrappy papers with a vintage, British feel with the same red, blue and off white.  Score!  (Also purchased at Boekenvoordeel.)


Each page was designed in PhotoShop Elements 11 on a 6x6 page.


I started the album off with photos from the trip.  The cover photo is a picture of the village.

This one reminds me of a postcard.  More photos from Serdinya, including a shot taken from the back balcony and our doggie.


On the drive you could see the Mediterranean from the gorgeous hi-way we drove on.  Though we do have to pay tolls for this route, the roads were dreamy, clean, safe and not too, busy.

Later in our trip, the boys got to swim in the Med.


My son and husband went on a long hike up in the mountains and because he's so wonderful, took pictures for me to scrap.  Hehehe...


Uitzichten are views in case you were wondering.

How about this backyard?  Absolutely fabulous.  The kids went swimming nearly every single day.


I love the way this one turned out and the photo is sweet.  How about the gorgeous view from the backyard?  No, not me!  The mountain.  Just kidding!


I thought it might be nice for my neighbour to have some pictures of the inside of her place incase she wanted to show them off to her friends or potential renters.


I was able to set up more pages in a format that would come out perfectly on my printer which uses an A4 format.  Two on one page to save paper!  You could make them perfectly 6x6 to fit right in the page inserts.  That would save a ton of time.

Print out all of your pages.  Then cut out each one.  Decide if you want a frame or not, but try to keep them the same throughout so you have consistency.

As you can see, my pages were too small for the book, because I wanted to save printed paper, so I adhered each page to my scrapbooking paper.  I often use both double sided tape and glue.  If one fails you have back up and the glue can give you just a touch of play so that you can line it up perfectly.

I use one large strip of double sided tape right across the middle, then glue close to the edges and in-between.  Keep in mind where your tape is and do not allow the page to land on that tape.  Line up around the edges where the glue is so you can slide it around until you get it in the right spot, then gently press where the tape is.

Cutting the pages, layering them up and inserting didn't take long at all.


The cover of this book had little to be desired.  So I found some pretty vintage scrapbooking paper that matched and cut out two square to cover most of the bluish colour.  I used the same method to adhere the square to both the front and back cover.

I applied a simple, paper pocket by applying double sided tape around the edges to three sides leaving the top open to insert an envelope with money.  I used some cardboard cut out letters after inking around the edges because the bright yellow looked a bit shocking on the blue.  If you're not super skilled at getting all of those letters nicely lined up, like me, then stagger them a bit.  I added a couple of cheap, blue paper flowers to give it more touch.  Spiral those extra wires to look like nice greenery by wrapping them around a tip of a small paint brush or pencil.


I had taken a lot of pictures during the process, but realised at the very end, that I forgot to put my memory card in the camera!!!  I've done that way too much.

On to the bow.  I just love bows.  They pimp up gifts and arrangements beautifully, cheaply and easily.  The key is to get ribbon with wire on the edges.  You can't fail!  I have one of those wooden, bow maker machine thingies, but have been making them long enough, I can wing it, now.

For this book, I used the ribbon around the entire front cover, both in and out.  I did a test run to see approximately, how much ribbon I needed so I could cut it. Then adhered the ribbon, right in the middle, where my finger is in this first illustration.


Make your first loop.  Then fold to make your second loop the same size as the first.


I, typically go smaller with each new layer.  Making sure with each layer that both loops are about the same size.  (That's what the bow making machine is for.)


Make as many layers as you like.  I go three or four, most the time.


With your left over, fold the end back under, in the middle.  Adhere if you'd like for a snug, stay put ribbon.


I went a step further with this bow and took some jewellery wire and ran one end through the middle of my bow and wrapped it around, pinching the bow to look puckered.  


Twist the wire to get the right amount of puckering.  Then simply tuck it under the bow out of sight.


There it is!  Such a big difference.  Sure wish I had that before picture.  At least ya get to see the finished product.  A gorgeous tag would make a sweet touch here, too.


This mini can be made rather quickly.  Most of your time will go into designing the digital pages.  However, there are even ways to get around that and we'll be back to show you just how easy it can be!

Thanks for checking us out.  Feel free to peruse our other tutorials and grab a lot of freebies if you like.


Friday, July 24, 2015

The Cherry On Top, The Talented Studio Designers and Free Stuff

Happy Friday, Scrappy Divas!

We've got a big one for you, today full of fabulous inspiration, some gorgeous new kits out and as in typical TCOT fashion, a couple freebies to give you a taste of the awesomeness of these kits and super talented designers at the Digital Scrapbooking Studio.

I'm featuring LouCee Creations, ADB Designs, PattyB Scraps and A-Manda Creation, too!  Whoo pah!  I can't wait to get started!

LouCee Creations has a super bright, fun kit Cake and Candles.  It's gender friendly and full of lovely elements and great papers to scrap any kind of party or jovial photos.  This is my oldest boy's second birthday party.   I didn't remember taking so many pictures.  I already did a traditional scrap of the event, years ago and it was so much fun seeing all of these faces, again.

 the studio

This was at our old house with awesome neighbours.  My nieces were so little, then.  Great memories while scrapping is just another awesome part of the craft.

For this second layout, I brought out some of the less theme like elements to show off the kit's versatility. 

I just love that squishy picture of JJ.  Hehehe...My father's square head!  Hehehe...

 the Studio


 the studio

As promised, we've got a couple freebies to share.  You can find this lovely page stacker over at The Cherry's Facebook Page.

 TCOT on FB

As soon as I saw PattyB Scraps new kit, So Precious, I had to have it.  I love purple and I also love vintage.  Such soothing colours and again, perfect for any kind of pictures you might want to scrap.

 the Studio

I couldn't resist scrapping this really rare and special picture of my parents.  My hubby took the shot the last time they visited us in Belgium, which was at least 3 years ago.  I lifted this layout from a sketch on our Free Sketches board on Pinterest.  If you need a dose of mojo, check it out.

 the Studio

I've fashioned these lovely elements into a cluster.  You can download it by clicking on the image.

 free download

Are these colours not totally fabulous?!  ADB Designs and Amanda Creation teamed up to make this beautiful kit, Summer Love.  Ya won't find too much theme pieces which makes it great to scrap anything.  I love that!  The kit is still offered at an introductory price.  It's under $5!  Click on the preview, below and check out the entire collection.  It's jaw dropping!

 the studio

I'll admit, I've scrapped this photo more than once.  The colours, the lighting and those two gorgeous faces makes me smile from ear to ear.  Pure perfection for me and of course, the beach background makes THE best backdrop for a picture.

 the studio

Here's a stacked cluster frame for something a little different.  These papers are so very beautiful.  That's why they are the feature on my layout.  Besides those two guys, of course.  You can download this freebie by following the links to our Pinterest Board.  Consider follow us while you are there.  We Pin inspiration of all kinds of crafty sorts and many, many freebies.

 Pin

Hop around to all of our social places and stock up on some freebies.  Follow, become a fan or leave us some love as a way to say thanks.  Hitting the + Button and sharing is always fantastic, too.  Remember all of our lovelies are for PERSONAL USE ONLY.  Do not sell them or claim them as your own.  Thanks!

Happy scrapping!