Saturday, April 30, 2016

Easy Hybrid Accordion Album with Tutorial


Welcome to The Cherry on Top's Hybrid Saturday.

Two weeks ago we made this cute spring card for mom and today we are looking at the insert, accordion album and pocket.  When you keep reading, you'll find an  in-depth tutorial, with tips, tricks and techniques to make scrapping easier, faster and prettier.  You'll also get a look at some recent hybrid projects as well as traditional ones and we are giving you a peek at a future hybrid freebie for the kids.

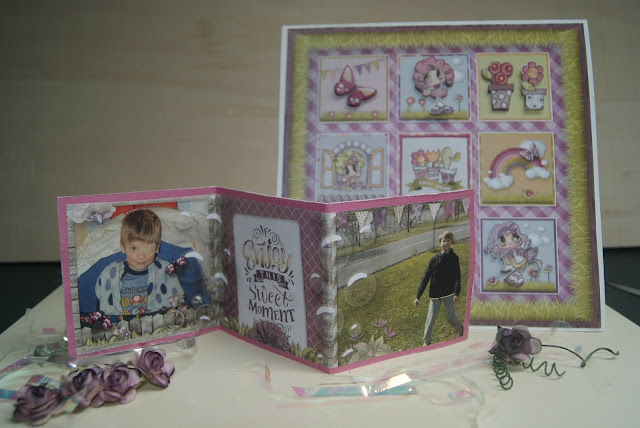
Here's the card I designed with 3D elements using Paty Greif Digital Design's new Spring In My Garden Collection.  This  collection is proving to be quite a success.  It's getting Pinned like crazy.  If you want to take a look at the tutorial and the card, click on the photo below.

You can also see today's project, accordion mini.  Keep scrolling to get a look at the tutorial.  It's made very quickly, easily and with few materials.


 The Cherry On Top

I designed a simple template and deleted it.  Ugh!  I have the new PSE and apparently the saving system is completely different.  So it turns out I lost quite a lot of tif and psd formats with all of those lovely layers.

Anyway...Hehehehe...  All you have to do to make this a hybrid project is plug in your photos, background papers and elements into a template which is just composed of these three squares.  Do it twice, print and adhere each strip to a sturdy piece of coordinating card stock. Fold it in three and you're set!


Here is the other side.


I wanted to make a pocket for the inside of the card so I could put this mini in there.

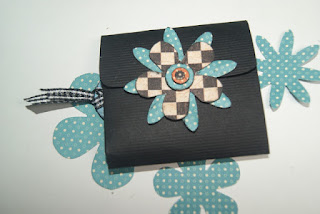
Pockets are a breeze to make.  Measure up the size pocket you need, place your adhesive in the right spots and that's it.


For a more decorative look, I'm framing up a sweet sentiment using this chipboard frame.  You could paint the frame or paper it like I did with some more coordinating scrap.  Actually, all of what you see today is from scrap paper.

Trace around your shape, cut, punch holes and adhere to the chipboard.  It doesn't take long at all.  If you paint, you have to wait for it to dry.


These were the tools I used.  The exacto is great for cutting out that rectangle in the centre.


This glue is my all time favourite for scrap projects. It has two ends.  One for fine gluing and the bottom for large surfaces.


I used brads and lined them up so the back does not show.  You can always cut off extra or you could adhere your frame right to the pocket with the brads, but I don't want my mini getting caught on the brads inside the pocket.


I rarely use rub ons because they seem to go to crap before I can even use them.

These from the Rusty Pickle were still in great shape and the sentiments are really useful.  I love using the packaging for my projects, don't you?  I used the backing from the rub ons to place my sentiment.


The words popped much better on the white paper than when backed on the pink.


Place the frame over the sentiment.


Adhere the pocket to the inside of the card and that's it!  So easy!


Clicker here for the free template in tif, psd and jpg.

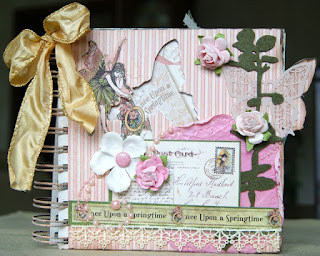
Here's a look at our last traditional scrap project with Graphic 45's Bohemian Bazaar.


This was last week's hybrid.  A fun, really easy air ballon with all free templates and in depth tutorial.  It's so fast and easy even the kids can do it!


Yesterday, was my oldest son's birthday and we got him a mega, crazy huge Nurf gun.  I designed these fun targets for him in hopes of him going for these rather than the pets and his brother!  Hehehe...I'll have them up on the blog for Throw Back Thursday.


Thank you so much for giving The Cherry your precious time!


Friday, April 29, 2016

Freebie Friday With The Cherry On Top, Throwing Some Scraps Around And MagsGraphics

Welcome to The Cherry On Top.

You know you are in for a treat when you see a title like that one!  Nearly every Friday designers release new goodies.  I'll be showing off two new kits, providing lovely inspiration and I'll let you count the freebies in today's blog.  There are THAT many!

Let's dive right in, shall we?

These colours, right?!  This is Throwing Some Scraps Around's newest kit, Everlasting.  Always gorgeous goodies, a lot of flowers and the papers are really great, too.  I scrapped our most recent trip to Germany.  My hubby has it in his heart to get a vacation home there.  I'm thinking, "Great!  Two houses I have to clean and maintain".  Hehehe...


Voila!  Gorgeous, right?!

Here prices are very affordable.  Wink, wink...;)

 TSSA kit

Check out all of these freebies that Jodi has around DigiLand by clicking on the previews.


 TSSA freebie


 freebie

Here's the freebie we are offering.  Simply right click and download.


Another new collection you can find on May 1st is Extraordinary You from MagsGraphic Designs.  She also has freebies you can find on her blog now and on May 1st.  Since we are on the topic of freebies, this layout uses a free template from Scrapping With Liz and I saw it was still available so I've linked up the image for you.  I hope it's still live.

This is JJ in warmer temperatures than now, eating a Smurf ice cream.  Hehehe...I really like the youthful feel of these colours and patterns.  They exude life!


This is Liz's template.
 free template

If you liked the first layout, I have excellent news for you.  It will soon be a free template.  It is one doozy of a template and it took me forever to design.  It is not for the faint at heart.  Hehehe...Keep your eyes out for when we release it.

Oh, hay!  If you just can't get enough freebies, make sure you ride the Lily Pad's blog train.  It is absolutely amazing.  Here are a few of the goodies you can find in it.

 free

 free

And here is another free template from Liz.  Is it not awesome?!

 free template


Have we set you up with some great free stuff or what?  Still not enough?!  Then ya better follow us here, on Facebook and Pinterest, where we show off free stuff every single day!

Thanks so much for hanging out with The Cherries.

Happy scrapping!

Thursday, April 28, 2016

Throw Back Thursday Mother's Day Idea

Welcome to Throw Back Thursday with The Cherry On Top.

On Thursdays, we bring back previous freebies that you may have missed and sometimes we open links to even older, popular ones.  Today, we thought we'd bring back these tea envelope printables in case you needed a sweet Mother's Day present for the up coming holiday.  They are free, pretty and you only need paper, scissors and tea to make them.  Scroll to see the two sets we have and when you click on the image, you'll get sent back to the blog with the free download.

For this week's photo, we're not throwing back as far as we did last week.  This little guy here will be 11 tomorrow.  So, I wanted to do a throw back for his birthday.


Here is one of the examples of free printable, tea bag envelopes using the designs from Alexis Design Studios.  If you love this kind of kit, click here to see the store.

 free printable

Here's what the print out looks like.  So easy!  Download and print.  All you need are scissors and tea to finish your project.
 free printable

Here's another set of tea bag envelopes using BoomersGirl Designs goodies.  If you like these kinds of designs, click here to see Lori's store.

 free printable

 free printables


So what did you miss last week?  Click here to see!

We will back tomorrow for Freebie Friday and we have an accordion mini album for Hybrid Saturday.  

Remember all of our goodies are for Personal Use ONLY.

Thank you for stopping by The Cherry On Top.

Wednesday, April 27, 2016

Graphic 45 Block Tower Gift Set

Welcome to The Cherry On Top.

On Wednesdays we show off fun, traditional scrap projects.  For the most part, we keep it easy and fast.  Not everyone dedicates the time to lengthy projects and they are often hard to even get started if you're not sure how long it will take.

Today's project can be assembled in well under an hour.  The project could take considerable time depending on how you want to embellish it.  I kept it fairly simple so as to save time.

Scroll through this thorough tutorial to see how you can design a tower like this, but with your creative stamp.  We will provide you with a free template and in detail, step by step directions with tips and techniques to make scrapping easier and more beautiful.


I wanted a collection that was versatile, bright and good for any occasion.  I chose Graphic 45's Bohemian Bazzar.  Are these colours not fabulous?!  I got this idea from Pinterest.  It could make a fun party favour or gift or you could just put it on a shelf and admire it.

Does this template look familiar?  You may already have it.  It's our template from the Advent calendar.  If you need it, click here.

The original version of the template should fit just right in either U.S. or A4 paper.  That's the size I used for the largest box.  For the other smaller boxes, I just did a print preview, chose scale and brought  each one down a bit.  Somewhere around 15% smaller for each.  It's totally up to you what size you use.

 free template

Download your template, print the sizes you want and then cut them out.


Trace them onto your desired paper.


You may have to mark where to fold, but it is pretty obvious.  Easy for me to say because I've used this template more than 30 times. Hehehe...


When you finished cutting out your boxes, check for pencil marks and erase or ink around the edges if you prefer.


Sometimes, just looking at the template can help you with the folds.


Choose your adhesive.  I often like to use a fast drying glue stick for projects like this.  This template can be very forgiving if you use a flexible adhesive and not tape.


You may want to pre-fold your paper and get a feel for how the box is constructed before you start gluing.  If you are a perfectionist, you could use a ruler for perfect folds.


All three boxes are finished. 


I love how the inside is pretty, too.


Gather up your coordinating goodies!  That's my favourite part.  There are so many colours in this collection, it was no problem finding elements to decorate.


You may  have noticed the little flag I used on the top box.  I took some craft wire, adhered a tiny glue dot to the end and wrapped this string around the entire thing, using another glue dot to finish it off.


I thought the coil was a quirky touch.


Put a tiny hole in the centre of your lid, leaving a small piece of the craft wire for the inside to bend over and adhere with washi tape.  Make sure you are using rigid paper to do the flag like this because it is a touch weighty.


You can use coordinating washi to adhere your tag/flag to the pole.  This didn't work wonderfully because my washi came from a discount store. Tip:  I took a large glue dot and rolled it up and it stuck wonderfully!


Another fun way to embellish is by using the detail pieces or strips on a paper from the collection.  I chose this one and...


...wrapped it around a thin paint brush to get a coiled look.


There ya go!  How easy was that?  Download your template, cut, trace, cut, fold, glue and stack.  

Take a peep at some of the details.  Starting at the tippy top, I used three tiny glass beads.  On the tag I added a few glitter dots for the centre of each flower.  I cut a couple of fun border looking strips from a paper from the collection and adhered them to the box.  On one of the borders, I added more of the pink, glitter dots, all of the way around the box.  For the bottom box, I adhered this fun, bold ribbon, layered up two flowers, added the pearl centre and used the coiled paper for more bada bing.


You can go totally crazy with this idea.  There are no limits.  

You can stuff the boxes with money, sweet treats, small gifties like jewellery, mini nail polish, lip balm... 

If you like projects like this you might also be interested in these:

This is matchbook mini album.  You can easily scrap this one up in a few hours or less.

 match book mini

If albums are your thing, check out our stunning mini.

 Graphic45 album

This one is a favourite of mine.  It's an accordion album in a large match box.


This is a tiny top hat made from a cereal box.  Get a free template and check out the tutorial.


Thanks so much for hanging out with The Cherry!