Saturday, October 29, 2016

Free Halloween BINGO Printable from The Cherry On Top and Kim Cameron Designs

 Welcome to hybrid Saturday with The Cherry On Top.

The day is fast approaching or maybe you're celebrating tonight or this weekend?  I hope we're on time!  If not, use this for any occasion to have fun with the kiddies.  Enjoy our freebie this week, check out some other inspiring designs from Kim and The Cherry and have yourself a wonderful Halloween.


Take note that the cards are very simple.  It's not meant to go horizontal.  Only up and down or across in straight lines.  I designed it like this for my young boys with Autism.  It is much more clear this way.  My youngest does not get diagonal, yet.  There are several different cards in the download along with the calling card you see, above.  Use candy corn as chips if you like.

 Hocus Pocus

I'm showing off my window, you may have seen in our Halloween edition and Kim's awesome template.  This kit is Hocus Locus and it's the same one I used for the BINGO cards.


 Warm and Cozy

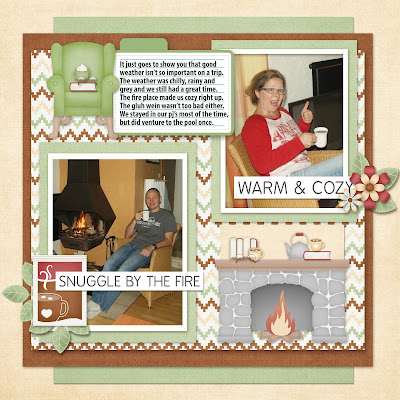
Some more seasonal layouts with Kim Cameron Designs is this one using, Warm and Cozy and a template from Lissy Kay Designs.


 Something Wicked

Here's another fabulous template from Kim and my silly boy.  Keep your eyes out for this lovely Halloween inspired kit, too.  Something Wicked!


 Something Wicked

And yet another template of Kim's.  She's having a sale in her shop at Daisies and Dimples.  You can grab all of this stuff for just a few bucks!  Ya gotta love that.

Enjoy and remember they are for Personal Use ONLY.  

Feel free to scroll through some previous blogs and find Halloween decor ideas, costumes and of course, scrapbooking inspiration.

Thanks for hanging with The Cherry.

Happy scrapping!

Friday, October 28, 2016

Free Paper Stacker with the Owl Card Making Kit

Welcome to Freebie Friday with The Cherry On Top.

Did you grab our Owl Card Making kit last week?  If you missed that one, click on the image.  You won't want to be without it and it won't be free for long.

I'm slowly turning this into a digitalised kit.  For today's freebie, I've got a paper stacker for you.  Keep reading to see some lovely inspiration that owl bet you'll love.  Hehehe...The stacker is at the bottom.

 free card making kit from The Cherry On Top

Above are three cards made digitally with the free kit.  I've given png versions of three sheets so you can decide if you want to use them digitally or traditionally.  Just print them out and do as you like as long as it's just for you.  All of our goodies are for Personal Use ONLY unless you contact us and we give consent.


Here's a nifty close up.  You could just right click and download this baby, print and cut and you've got a card.


Here is what the digital versions look like, all printed out.  Pretty sweet, right?!


This is today's freebie.  Simply right click and save it to your downloads.


Here's an example of how to use a stacker.  Just add right over the top.  My bows looked kind of weird upside down, on my top banner so I covered them up with large flowers and repeated the bow, but the right direction.

Paper stackers are great for when you lose the mojo.  They are a super starting point.  Find some coordinating goodies and some photos and you'll scrap fast.  Don't forget you can use our card making kit to scrap your stacker.

Tomorrow, we'll be back with our free monthly planner inserts for Novemeber.  You won't want to miss those so make sure you follow us here, Pinterest and Facebook, where we post freebies nearly every single day.

Thanks so much for hanging out with The Cherry!

Tuesday, October 25, 2016

Halloween Decor Ideas With The Cherry On Top

 Welcome to The Cherry On Top.

I've got a special edition for you, today.  I'm just nuts about home decor and Halloween.  This year, I really wanted to push the bar of Halloween in my little village in Belgium, where Halloween is slowly catching on.  Check out what I did with my picture window, front yard and my costume all with a pirate theme.


I wanted good, day time pictures so you can see the detail.  I only spent $37 for everything this year, including candy.  Most of this stuff is just from the house and garage and my skeleton I bought last year.

Let's take a peep at some of my favourite details with this display.  I dressed my skeleton a touch.  I wanted to buy a cheap pirate custom and dress him, but thought the $30 was already enough.  Last year I spent three times as much on decor.  The hat I bought ages ago and the patch is my kid's he uses for ocular therapy, turned inside out.  Hehehe...  The chest comes from my living room, where I conceal the toys and keep down clutter.  I left it full and put the blanket over the mess. This way I didn't have to really fill it with candy coins and treasure.  I didn't have that much.

I love all of the candles in wine bottles and the large, stacked books.  I used tons of my 80's jewellery that haven't seen the light of day in ages.  The flag and that skeleton in the chest were new purchases.  The rope was from the garage.


Here's a look at my window. It's always my back up in case the weather is terrible, which it often is here.  Hehehe...Just more empty wine bottles with candles, bones, jack o'lanterns and some gold or brass decor items from my house.  The spider web was a neat touch and really fun to spread around.  I considered next year to just not dust my window for a few months and I'll be set! ;)


Here's my other display.  Some old wooden crates from the garage and burlap bags and more rope.  The only purchased goody was the chalk board sign.  More wine bottles with candles and empty beer bottles scattered about.  Another pumpkin for cohesion.  You'll see a lot of items from here also in the first display.  This makes it all go together so well.  I spread out the chocolate coins all over both displays, too.  The candles provided much needed light for at night and that fire pit was a huge feature.  It was really cold and so damp.  The visitors for our neighbourhood tour, loved standing around the fire to warm up and so did I.  It brought lovely ambiance with the candles and another great and unique feature was pirate music.  My hubby made a play list of pirate songs and pirate sounding songs.  Irish and Scottish folk music were great for this.


My costume was a breeze and all clothes that I wear, normally.  Except for the jewellery.  A long linen, white, flowing top/dress with layers underneath for warmth.  That's just a wool vest over the top and a mid season scarf tied around my waste.  I'm sure you recognise the bandana.  I have a ton of those in various colours.  I made a few simple braids and used elastics with beads already attached. I just wore black leggings and high black boots.  This look did not take long at all.


My husband surprised me by buying a costume!  He never dresses up. It isn't his thing and after a couple of glasses of wine, totally pirate like, he was an awesome pirate.  The kids loved him!  He made the coins come out of their ears and kept them coming back for more.


This is my niece and two boys.  They both have Autism and my youngest does not "do" costumes or make up, but he did throw last years costume over his clothes.  Hehehe...My oldest wanted to be a creeper.  We got this concept from Pinterest.  He worked all week on the panels.  They are just made from a tore up box and this pattern printed out and glued down.  I also found the pattern on Pinterest.  My husband did the engineering, which I think could use a lot of improvement.  In the advertisement I saw, they used elastics.  We had a huge time issue.  Hehehe...He was pleased enough and I thought the concept was pretty good.  I'm sure I would have done it differently.


Here's the night shot.  Cozy, eh?

If you are looking for more Halloween ideas check out what we've done previously.

 Here's my window from last year.  Click on the image to see the blog.  There is a lot of good stuff there.

 Halloween with The Cherry On Top

There's also this mega easy and free costume over there with more ideas and tips.  This is a great costume for kids who really don't want to dress up.  It's their normal clothes so no issues.

 easy, no cost costume


Here's the window from the year before with nifty tutorials.  Where to get the images I used for these cut outs...

 Halloween with The Cherry On Top

How to make this witch's broom from the stuff you already have at home...

 free broom idea

and more decor ideas along with costume ideas, games and craft projects.

 Halloween decor

If you want to Boo your neighbours, I've got free printables for you.  Find them, here.

 free Boo Your Neighbour Printabes

Find all of this stuff and so much more on our Halloween board.

Thanks so much for checking us out this Halloween.

Happy haunting!


Saturday, October 22, 2016

Printable Card Making Kit From The Cherry On Top

Welcome to The Cherry On Top.

I am so excited about today's blog.  I've been wanting to do this project for months and finally did it this weekend.  As you may know, I love scrapping digitally AND traditionally.  I've got scrappy sisters in both digital realms.  Some are die hards and wouldn't dream of going over to other side while I stay dabbling with both.  Why limit yourself?

This project is for ALL of my creative sisters. Whether you love to get glue and glitter on your fingers or you'd rather caress your keyboard and mouse, these items are perfect for you both.

Keep reading to find out more about these printable digital goodies, turned traditional or hybrid.  All ya need is a printer, scissors and adhesive or a computer and printer.


These three images are examples of cards you can create with my three sheets of goodies.  If you do it digitally, don't forget your shadows to get this dimensional effect.  If your going traditional, use some foam tape or thick glue dots for extra dimension.

Don't forget to position your cards according to where you want to fold it in your software program if you decide to do it digi style.  If you place your image at the bottom of your page, all you'll have to do is print, fold your paper in half and if you want, cut off any excess.  If you want your card to fold the long way, like the first image, then you need to rotate your image and place it at the top of your page.  Don't forget!!

Here is a glimpse at all three sheets.

 Kreative Design Studio, Owl Always Be There
I've even designed a few clusters for faster scrapping.

I thought I'd include a few solid pieces for you to use in your project or use as a sample to match up papers with your own stash.

I kept the theme very general so you could use these cards or objects for any project you have in mind.

If you have a cutting machine like the Silhouette, you're set!  Unless you are like me and don't mind the fussy cutting.  Hehehe...

The digital images are with a clear background.  You'll need a bit of computer savvy to separate them from each other.  If you have PSE, just crop and if it's not enough use the elliptical marquee tool to get rid of the other part that's showing where you don't want it.

Consider your paper.  Use a rigid paper for your base, regular weight paper for the layers and perhaps mid weight paper for the elements.

I'd LOVE to see what you do with this card making kit.  Post in our group.

 Kreative Design Studio


We are so thrilled you stopped by The Cherry to check us out.  Make sure ya do it again and follow us here, on Facebook and Pinterest so you don't miss all of this crafty goodness.

Here are a couple of similar projects you may have missed:

Join us in our one card a week challenge.
We scrapped this with just scraps and an old holiday card.

 recycled holiday card

Here's another hybrid card.  With just a few changes you can change your layouts into cards.

 free hybrid card

Another lovely hybrid.
 free hybrid card
Happy crafting!


SaveSave

Friday, October 21, 2016

Freebie Friday Mega Link Up With The Cherry On Top

Welcome to Freebie Friday with The Cherry On Top.

I've got so many freebies to share with you, today.  Be prepared to be impressed!  I've also got some of my favourite designers in the lime light and some layouts that will certainly inspire you and make you want to scrap, today.

 Efflorescence, Throwing Some Scraps Around

How about this first layout?  I love everything about it.  Fabulous template?  CHECK!  Gorgeous kit with the most awesome colour palette?  CHECK!  Super photos of those I love best?  CHECK!

Throwing Some Scraps Around has outdone themselves with this stunning collection of digital scrapbooking goodies.  Efflorescence is a master piece and a kit you will certainly want to have in your stash.  Above I used a coordinating template Jodi offers as well.  I often use a photo in place of a paper.  I just love my big photos and you will love the prices for these goodies.

 Efflorescence, Throwing Some Scraps Around

Here was a bit of a free for all.  I love these ripped papers and those mushrooms.  I stuck with the elements that were water coloured to keep a solid look.  I can never resist purple bling or butterflies.  I used the twine as a frame for my dear hubby.  It's impossible getting a serious shot of him.  Hehehe...

This is what the cluster looks like on it's own and I've got it available for download for you.  Right click and save to your downloads.


This is what the page looks like without the large photo and cluster frame.  Not too bad, right?  Jodi has it available for free on her blog.  Click on the preview to get there.  You can use both and make an LO just like mine.

I've got a few more new kits and freebies up my sleeve.  Keep reading to get more.

 Wintergreen, MagsGraphics

Wintergreen from MagsGraphics Designs is now available in the shop.  Though we don't get too much snow in these parts of Belgium (darn global warming), I take pictures and the kids enjoy it as much as they can before it's gone.


Would you like to add this free template to your digital downloads?  Leave me a comment here or in our Facebook Group, where you see this layout. Once we get to a dozen comments, likes or shares, I'll make the link public.

 Kim Cameron Designs

My gal Kim from Kim Cameron Designs has a Zombie Run going on in her Facebook Group.  She gives free stuff with each week's challenge.  I used her Zombie Apocalypse kit and a new template that is coming soon for you.  Hint, hint...

 Lissy Kay Designs

Here's another layout using Warm and Cozy also from Kim Cameron and I used a free template from Lissy Kay Designs that you can find on the Your Stories Go Digital Facebook page.

 freebies from Kim Cameron

This was a free template from Fanette Designs and I paired it up with Kim Cameron's FREE elements and papers that are in the Digital Scrapbooking Studio's, Next Designer Contest.  This my fans, is a major freebie link up.  There are around a dozen contestants and everything they are designing is FREE for us.  How awesome is that?!  


I designed this with Bethaicreations awesome entry in this contest and it's ALL FREE!

There is an opportunity for you to vote for your favourites as well.  You can guess, perhaps where my votes are going?  It isn't easy.  Head over to the Studio, grab these awesome freebies and vote for your favourites.  Share the link with your other freebie finding friends and have them vote, too.

I told you you'd be impressed with all of the freebies, today.  

Not impressed?  Here are some other freebies you've missed.

A lovely free cluster frame.

 freebie from the cherry on top

A gorgeous overlay!

 free overlay

A free quick page.

 free quick page from the cherry on top

This blog's full of freebies and links to even more freebies.  Grab a cup of Jo, put your feet up and scroll through and see what you can find that fits in your supply.

I've got even more freebies on our Facebook Page and Group as well as other freebies posted on our Pinterest boards.  Be sure to follow us so you don't miss out!

With all of this free stuff, you can get scrappy, today!

Thanks so much for hanging out with The Cherry.


SaveSaveSaveSaveSaveSave

Tuesday, October 18, 2016

More Recycled Christmas Cards. Are You Keeping Up?

Welcome to The Cherry On Top.

On Tuesday's we go all out traditional scrapbooking.  I'm back with another up cycled holiday card.  At least one a week, I'm going for and so should you, if you want home made cards for the holidays.  I'm looking for projects that I can actually use or give as gifts rather than sit on a shelf and collect dust.  Projects that keep the environment in mind, are fast and easy to get together as well as free or nearly free.  This way there are no excuses why we wouldn't get scrappy!


This is not an easy thing to do, but I'm showing off my terribly neglected scrap place.  Oh, My Goodness!  It has never been this bad.  I thought I might make you feel better about yours.  Hehehe...


Here's a quick tip on organisation.  As if?!  Looking above, you may think I have no system and rightly so.  I often collect small, rigid containers for my tinies.  Here is a mint tin.  I used a glue dot to adhere an example what's inside, on the lid.  This way I don't have to open it to see.  I more than not, use clear containers for this.


On to today's up cycle.  This card with the neat cut out lettering.


Cutting right down the middle and reusing that smaller "kerst" journaling.  I'm so terrible with journaling, script, stickers, alphas...Any excuse to get out of it and I've got it.  Hehehe...


Grab like colours that reflect in your images.  Try to get them as close to perfect.  Layers always make a project look polished.  


Cut around those letters...


Apply to another card that is plain or rigid or use some good card stock if you have it on hand.


Keep envelopes in mind if you need them.  I keep all of my plain envelopes that no one wrote on.  You can always design your own, custom envelopes to fit or not use them at all if possible.  Dangle them from your gift like a tag for something different or just tie a ribbon around them.


I layered up the inside script just like the cover and used some sticker letters that were also a bit quirky.

A recycled card made in under 20 minutes!

You could always add a tad more glitter if you like.

Take our challenge and try to get at least one home made card done a week.  Feel free to show off what you design in our Facebook Group or right here in the comments.  We'd love to see what you're up to.