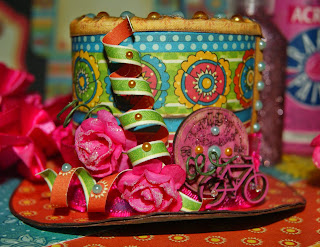
Welcome to a crafty edition of The Cherry On Top.
I've got that top hat I promised and this one was designed totally in a traditional scrap fashion. I'm providing you with a step by step tutorial, a hit up of the hybrid hat and the free template so you can make one yourself.
Let's take a look at the materials you will need.
rigid paper
template
scissors
glue/glue dots
double sided tape
tape
embellishments
Cut out your template as shown below. There are a couple methods of applying the top of the hat. If you want to just use the circle, then you don't have to cut out all of the squares around it. The same goes for the bottom of the hat, but using the teeth for the bottom/brim will add stability and strength.
Here's one of the methods to apply the top of the hat to the middle of the hat. I had difficulty doing it this way when it came to adding it to the bottom of the hat. I couldn't always get it just right.
I traced around my templates on to my paper.
Then cut them out.
Put the teeth in place by popping them up then fit the middle of the hat so it lines up nicely with the teeth. I used tape on the inside to hold it in place where it fit.
Then used double sided tape on the seem to close it up.
If you are going to use rigid paper, then you might want to consider using tiny glue dots on your teeth, like shown below. Glue is more forgiving, but it takes a while to dry and you might find your teeth popping off the inside of the hat.
I used a scissors to get in there and apply each tooth. It isn't a huge deal if a few teeth don't stick. I found the glue dots to work really well and I didn't have to go back and keep applying the teeth to the inside of the hat. However, if you are using regular, light weight paper, I would consider glue. It works easier and there is more room for mistakes. Otherwise, you might tear your paper.
Some of the time, my teeth on the top of the hat just didn't fit right. If you are using riding paper and you fin that you also can't get the fit just right, simply use the inside circle of the hat. I used glue around the outside edge of the inside of the top of the hat and dropped it on the middle of the hat.
Then I placed this very light ribbon spool on the top until the glue dried.
The top was just a tad bit too big so I snipped around the edges slowly and carefully with small, precise scissors.
Choose a band for your hat. I went with the antique looking gold and inked around the edges in black. Take a look at your band and make sure none of the white around the edges is showing from where you cut. I didn't do that! Apply the band with double sided tape, glue gun or glue if yu are working with light weight paper.
I had this awesome embellishing from Webster's Moments, but it was a bit too long, so I snipped off a bit at the tips.
To fix my problem with the white exposed around the edge of my band, I used some black eyeshadow. The effect was even better than the ink!
I used a really narrow glue edge type of double sided tape to adhere my ribbon. That way I didn't have to wait for the glue to try. I get so darn impatient with this part. Hehehe...I just want to decorate it and make it pretty, ASAP! Hehehe...
To cover up the line going down the back of the hat, I used these tiny gold dots with tiny glue dots on the back to adhere. It adds a nice touch to your look.
Add a couple of flowers, greenery, beads, pearls, pins whatever you choose. I used this beaded pin and three paper flowers, twirled the green wire into this shape. That's it! This is the back of the hat. I left the front plain. With the band and the ribbon it looked great. I do display it this way, though.
Here's another paper hat I made. I used a cereal box for some serous rigidity and papered over it with Graphic 45 lovelies. I pimped this sucker way up! Hehehe...Click on the image to see more about this project.
I've got other free templates for you, too. Here are a few recent ones. A diamond inspired, digital template for your digital scrapbooking projects and our really popular, paper apron template!


Happy crafting!


No comments:
Post a Comment