
Welcome to The Cherry On Top.
Recently we went searching for tree inspiration around the web. Making certain that our techniques were up to par. We found some pretty amazing trees. There were definitely a lot of "wow" trees out there, but we wanted just a basic, everyday kind of tree. One that will get decked out fairly quickly and not break the budget.
Not too much was found. So we figured we'd do one ourselves. Totally basic tree decorating will be presented. We'll start from the bottom and work our way up, then around and then up and down.
I bought this basket last year for just around 10 Euros. I didn't want to ruin the floor so I took this tree skirt, which didn't match at all and pulled it all into the centre so that only the ruffled rim would show.

Voila! The floor is nicely protected. I've used blankets for this as well and the pets just loved it.

As you may have read in our previous blog, we've got a new to Christmas kitty. So, I had to be certain of the trees stability. Two years ago, ours got knocked over and most of my glass balls were broken.
Put the poles in place, tighten the screws for more support and begin inserting the branches.
Before each insertion, arrange your branch just as you like and to make sure you don't have holes in your tree. There are many ways you can shape your branches. If you look carefully, I put my branches slightly bending down. I also ocellated one up and one down on each brach. This gave the tree a very full effect.
You could stick your branches straight out or you could bend them upward for a different look.

The tree is now fully assembled. The lights will be next. I start from the bottom and work my way around. I've had terrible luck with my lights. This time, I bought LED lights and I didn't go cheap. I found that I had to keep buying lights every year when I used the cheap ones. That's not good for your wallet or the environment. There are bluish lights, coloured lights and warm lights. I didn't care for my blue LED lights as much as the warmer ones. If you're going modern the blue might be great. If you're doing a classic or natural look, the warm lights will look more cohesive.

When I do the lights, I make sure that the same amount of space is between each new level and I put the lights in about the middle of the branch.

The next step is to place garland, ribbon or beads like these around the tree. Start from the bottom and work your way up and around the tree. If you look closely, you'll see a wave pattern in my beads. They don't just go straight across. (Of course now, I fixed the wall paper on that wall. Hehehe...) I even saw, in my research, bunting! I'd love to try that one year.

Now, for the fun part. The ornaments! I used my very cheap, plastic purple and silver ornaments so the kitty won't break them. Think of a colour palette you like. Go modern or classic red, white, green and gold. That's always my favourite. Think about a theme or consider monochromatic. Go natural, vintage, shabby chic. Maybe use silk flowers, folk items, Santa items, snow and flakes. Think about the colours in the room if you'd like.
Colour will give your tree uniformity.

I started with my biggest decoration. Think of it like a triangle when your hanging the goodies.
It's ideal to have many of the same sized and colour ornaments. Remember to buy in quantities of at least 24, depending on the size of your tree, for a good, solid and cohesive look. I used these purple balls in a variety of sizes. Some have glitter and some are mat, but they are all similar.

This is the basis of the tree. Even, spread out larger ornaments that are relatively the same. Now you can go nuts with the rest of your ornaments.

I spread some white and silver ornaments in between. Still using the pyramid or triangle technique to hang the ornaments. All of that glitter and gems catches the lights, just lovely.
If your scarce on ornaments and still need to fill in large areas of your tree, try floral sprays. I used some at the top of our tree. I also used some curly, beaded sprigs and put those all around the tree, too. They come out just a bit. This adds a bit more interest. Long decorations are nice to put in between there as well. They'll bring out the length of your tree.

Think variety! Long, short, fat, skinny ornaments all spread out evenly will look super finished and polished. My mom always loved tinsel and of course, there is spray snow, too.

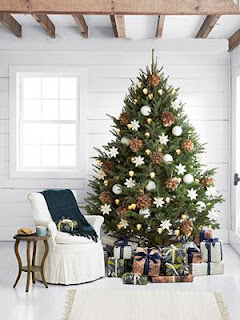
That's it. A nice, basic tree to brighten up the area and bring the spirit of the holidays to your home.
This tutorial was in our last blog. Click on the image if you'd like to check it out. This costs us about 3 Euros to make and under 10 minutes to assemble!

Here were our two favourite galleries for more tree inspiration:

Thank you for joining us. Feel free to leave a photo of your tree in the comments.
No comments:
Post a Comment