Welcome to Traditional Scrap Tuesday with The Cherry On Top.
We started making cards for in our card box last week and we're continuing with that this week. I've been crafting forever and have come to the point that I want more of my projects to be useful. I have enough creations sitting in the attic gathering dust. I'm on a mission to scrap with purpose and I'm sharing those ideas with you.
We're getting several birds with one stone with our latest designs. Using old Christmas cards, scrap pieces from our stash as well as non conventional goodies to scrap or craft with. This will save you money and it's better for the environment, too.
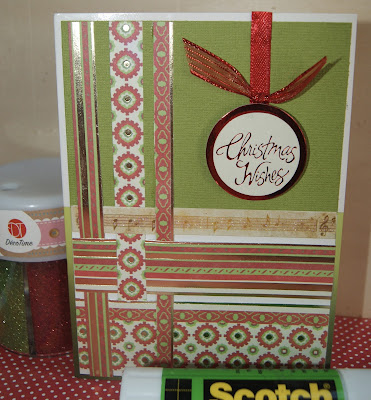
Today's project is this up cycled Christmas card. Keep reading through the tutorial with tips and tricks to scrap fast, efficient, inexpensively and with green in mind.
This was last week's card. You can click on the image for the tutorial.
This is the card we are upgrading. It's just lovely on the outside and I didn't change it a bit.
Here's the inside.
I've eyed up a window spot so that I can leave the sentiment and cover the rest. I put the piece of scrap over the writing spot and held it up to the light so I could see that I had it directly over the journaling.
Take a piece of paper you want to use, turn it over.
Then lightly scribble across the underlying paper to see exactly where the box is that needs extracting. Easy, right?
Use either an exacto knife or a paper cutter to cut out the window.
Turn your paper over and make sure the box is just right. Apply your adhesive and place it just right. Start covering the rest of the card or at least where there is writing, with pieces of coordinating scrap. Personally, I think colours make or break a good project. Using collections is THE best way to get a good cohesive look in any project. Make sure the colours match as closely as possible.
Here are some more strips to cut. Consider placement and pattern. The main page is basically white so I used strips with mostly other colours than white. In this case, red. This gives the card a balanced look.
I used these nifty sticker ribbons or edges in this overlapping "L" shaped form for the basis of my cluster.
More coordinating goodies from the discount store. These lovely large brads are perfect. I used my wire cutter to ditch the fastener.
Then applied this huge, thick glue dot. I believe it's a Zots brand and it is truly the best glue dot I've used to date. These large ones add dimension and the sticking power is fantastic. They even survive the fluctuating temperatures in my attic.
I need a few more layers in my cluster. I went for some ribbon that matched sweetly. A printed or patterned ribbon would have made the look too busy. Plain ribbon would be best on this pattern paper and the ribbon gives the card a nice, soft textural feel.
That's it! Not a penny spent for this card. I used all stuff from last year and scrapped up this card in under 30 minutes.
Scrap efficiently, cost effectively and keep the environment in mind and you'll feel good about your projects. Find out how by following our tips. Have a project in mind, look for a template to follow before you begin grabbing goodies and this will save you a lot of time behind the desk which is why a lot of people don't scrap. If you can save time, you'll find the time to scrap more. Let us show you how!
Thanks so much for checking out The Cherry. We'll be back with more purposeful scrapping next week.


No comments:
Post a Comment