Saturday, February 6, 2016

Paper Wallet Project with Template

Welcome to The Cherry On Top.

Saturdays are for hybrids.  We take digital designs, print them out and build up beauties.  Today, we've got this awesome paper wallet that you can give as money and gift card holders.  I've made a couple of different versions so you get the idea of just the kind of things you can create with our template.

Keep reading to see all of our examples, get inspired, check out the tutorials, see the actual finished projects and if you like, grab our template and start designing your very own wallet.  You can even add a tiny album to your wallet.


I used Daddy's Day from Crazy 4 Monograms to design my first wallet. (This store is longer live. :() I thought it'd be perfect for a man's gift.  The top image is the outside front and back.  Just cut around the outside and fold.  You could just cut out the second rectangle with all of the pockets and make slits for goodies to stash.   Adhere it around the sides and bottom edges to the outside cover.  Of course, you could print front to back if your savvy enough, but then you'll have problems with the pockets, but you could just use it as a typical card.

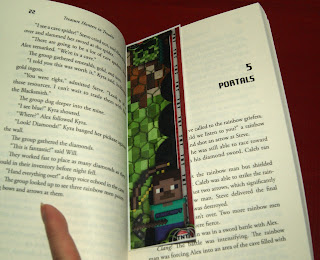
Once again, I'm featuring Minecraft and MagsGraphics awesome kit, Pixel Miner. I've used this for several other projects such as bookmakers and invitations.  Both my boys are Minecraft crazy! This will be perfect to put in a couple of bucks and a gift card for his favourite gaming store.  I know Liam is going to love it.

Maggie also has these fun, dimensional effect journal cards that'll look totally cool stuffed into the pockets.  Click here to get her kit.

I wanted to do something feminine, too.  I was  a bit perplexed over what kit I would use when I remembered this free kit I download a couple of months ago from One Of A Kind Designs.  Isn't it totally Lisa Frank, frig'n awesome?!  And it's FREE!  I've got the link a bit further down.


Click on the image to get this awesome kit for FREE.

 One Of A Kind Designs freebie

Here's a closer look at the template which comes in two parts.  This way everything should come out printed perfectly, but you should check the size for certainty. It will print out at 8" in length if all goes well.  Make sure to check your settings! I couldn't get all of the parts on one page.  Check out this illustration.  It's all very easy.


This second page is the pockets.  Clip in your desired papers, print, cut and adhere the pockets.  Remember, don't glue all around the edges.  Leave the top open.  For the large pocket, consider gluing just the left and bottom, like a real wallet.

We'll be inserting a mini album into one of the wallets.  If you want the inserts for that, you'll need the third page.  Copy the background for as many pages as you want.


Let's get some glue on our fingers and see how this whole thing can be put together.

Once you've clipped in all of your goodies on the computer, you're ready to print and cut.


You can see the wallet to the right and the cards to the left are for the mini album insert.


Choose to either glue, double sided tape or even sew the inside of your wallet to the outside. I cannot believe I didn't think to change the color of the stitching.  Clip in a background just like you would for any other part of the template or just ditch them entirely. Total duh, moment.


How the inside will look.


How the outside will look.


There are so many ways you can do this project.  You could print out just the inside and outside without the layers like illustrated here.


Cut off any edges that aren't perfect.


Either glue, tape or sew the outside to the inside and you'll have just a card.  This is the easiest and fastest way to finish your project.  You can always just fold the money and put it in like you would a normal card.


Cute inserts, eh?  Tip: Look at the slight discolouration in the centre fold.  That's because I used 300 weight paper.  It's doesn't look so prominent when you use a lighter grade. I used three different grades of paper and they all worked great.


I had an audience when I was fashioning my photos.  My boys couldn't wait to get their hands on these wallets.


Keep it really simple by just using the inside and outside as a typical card and it'll just "look" like a wallet or...


Use all of the pieces of the template and layer up a real wallet!  Your's will come out on more than one sheet of paper as instructed.  I saw that this way it was on the small side and improved the template.


Print and cut out all of the desired layers you wish to have for your wallet.


I used super thin double sided tape for this one.  I layered the bill section on top of the inside layer.  I used tape on three sides, leaving the top open for the paper money.


Then taped two sides for the largest pocket that goes on the left side of the wallet.


This is a nice size space for you to put some goodies.


The next step is to layer up your pockets.  I used three.  Start with the largest pocket as instructed.


Go from largest to smallest.  It's that easy.  Don't forget, leave the top open for your inserts.  This is so cool!


Tip: A short cut you can take to this project is simply slicing where each pocket is BEFORE you adhere the inside to the outside of your wallet.  This works really great and will save you time from all of that layering.


My simple paper cutter worked just great.  You could also use an exacto.  I didn't cut all of the way across.  Think of an actual wallet during your construction.


This image shows you just what it should look like.  You could also make the same kind of slits across the smaller pockets so you can insert your gift cards and what nots.  You HAVE to do this BEFORE you adhere the inside to the outside of your wallet.


I'm also showing you how to put in a mini album to make this project even more fun for the recipient.

Scrap up a couple of inserts using a kit of your choice.  The template is provided for you.  This way they all come out the same size.  Keep it simple like you see here, to save some time.  These only took me a couple of minutes to comprise.


I glued them back to back.  Switching out an image, then a picture, then an image and then a picture and the end page is the plain, coordinating yellow piece from my paper scraps.


After gluing your pages together, back to back, score them all in the same place.  As shown here, below.  I strongly advise, folding each score so the pages turn easier once attached.


I'm trying out good double sided tape for this mini as a way of binding it to the wallet.  You could sew or glue gun, too.


Make sure you are gluing the correct side!  I almost made a boo boo.  Hehehe...


Don't forget those folds.


All in place!


So cute!


With extra folds, your album will open up splendidly.


So there you have all kinds of inspiration and THREE ways you can use this template.  As a typical card, layered up or with simple slits.


Click here to get to our shop for the templates.

If you want to see more of projects we invite you to scroll through or hit up our Pinterest Boards where you can catch all of our freebies and projects.

Here are some recent projects related to hybrids like you see here.

You can grab this fun Minecraft book marker for free.  Click on the image.

 Minecraft bookmarker

We've got a tutorial on how to make this Creeper piñata.  It's mega easy, made in under an hour and you won't even need to buy anything if you have a decent stash.


 Easy piñata

These shadow puppets are also free.  Click on the image to get them.

 free shadow puppets

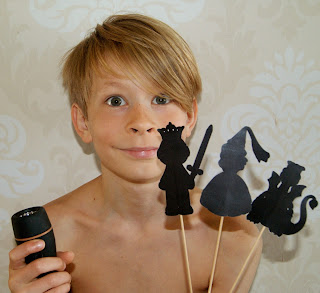
Click on any of these images to get the tutorial and freebies.


 free heart basket card for dad

Thank you so much for checking out The Cherry!  Join us on Facebook, Follow us right here and or check us out on Pinterest to keep up with all of the paper and digital fun as well as daily freebies.

Tah!

In My Heart Inspiration and a Freebie

Welcome to Freebie Friday at The Cherry On Top.

Friday's we share our most recent digital freebies.  Although, you can get tons of free stuff every day on our Pinterest and Facebook.  Our blog is full of freebies, too.  Grab a cup of jo and scroll through all of the fabulous goodies.

Throwing Some Scraps Around has a new release today, In My Heart.  This kit is warm, passionate and full of texture and love.  A tab bit rustic and a touch of nature will give your projects a boost of pow and wow.

These purples spoke to me.  Coupled up with this country rose giving this kit such a romantic feel. Oh! I just noticed my shirt matches that pink!  Hehehe...My favourite spot in just about the entire world, the Mosel River in Germany with their fantastic regional wine.  The grapes are so delicious.  We snuck a few from the wine yard we were passing.  Well, they just may have been forbidden fruit.  They were as purple as these flowers and they were heavenly sweet.

 Etsy TSSA

I loved this layout so much, I'm turning it into my Facebook wall and profile covers and you can snag the wall cover free from me.  Let's check out what you can do with it.

Right click and save.  Blogger accepts png images so the frame will be blank and you'll only have to insert your photo or journaling under the image.  Very easy!


There he is!  My sweet hubby ready for a toast.  I added a fun title that should just fit over the profile picture.


This is what I'll use on our Facebook Page.  Use however you like, just remember that it's for Personal Use Only.  Use Jodi's kit to create your own, coordinating profile picture.


Here is a closer look at Jodi's beautiful kit.

 Etsy TSSA


 Etsy TSSA

If you don't have "time" to scrap, but you love these layouts, then you are the perfect candidate for quick pages.  We've scrapped them up for you.  All you have to do is put in your pictures.


 Etsy TSSA

I'm sharing a couple more layouts using Throwing Some Scrap Around.  I feel magic with Jodi's kits and I think some of my best work is with her designs.


 Pinterest


 Pinterest

 Pinterest

 Pinterest

If you love Jodi's kits as much as I do, consider joining our team.  I've been with Jodi for years.  She's an absolutely wonderful person and THE easiest designer to work with.  No pressure, just fun.


You can find all of Jodi's digital designs on our Pinterest board or on hers.

Check out Jodi's blog, Store and Facebook Page.

She's got this freebie her blog.
 Throwing Some Scraps Around


Thank you for hanging out with The Cherry!


Tuesday, February 2, 2016

How To Start Digital Scrap Booking For FREE

Welcome to The Cherry On Top.

We are often asked, "How do I start digital scrapbooking?"  What an excellent question!  We can totally get'cha running and all for free, too.  That's right!  You don't have to spend a single cent to get started digital scrapbooking.

Read further about the various kinds of software, supplies, tutorials, links and of course in Cherry fashion, we'll give you a ton of free stuff to get you started and you'll be hooked on digital scrapbooking, too.

First, let's look at the differences as well as the commonalities between traditional/paper scrapping and digital scrapbooking.

The aesthetic is completely the same and you can apply most of your techniques to your digital layouts and projects.  Don't forget, that you can create just about anything digitally.  Just like you can with paper and even both when you go hybrid.  Hybrid is when you design your project digitally, then print it out and shape, glue and fashion up your finished project.


This a traditional scrapbooking, tag mini album.

I totally layer up in the exact same manner with my digital projects as I do my traditional ones.  Learning to shadow in digital is a skill you'll have to learn, but no worries.  There are actions that do it for you and you can also use templates and transfer/copy the designer's shadow to your design.


This is an example of a digital layout.

As in traditional, when it feels like something is missing, I layer up and keep adding.  Just like I do in my digital layouts.  We often joke about using elements to cover mistakes.  I do it in pictures, digitally.  Putting a flower over some unknown who is in my nearly perfect picture.  Hehehe...

Of course, an enormous positive point to digital scrapbooking is your cost is minimal, depending on your software.  You also never run out of supplies.  If you fall in love with a paper/background, you can copy it as much as you like.  Same with that fabulous flower you've been saving and afraid to use because it's so pretty.  Hehehe...There is no mess.  No glue and your glitter doesn't go anywhere you don't put it.  You don't need any space and you can scrap on the run without dragging all of your supplies with you.


Another digital layout using a template.

Let's talk about time.  Digital scrapbooking/crafting can be a huge time saver.  There are so many goodies out there that are half finished or designed to make scrapbooking fast and easy.  Some have the shadows all ready.  Designers have what's called a quick page,  All you have to do is plug in the pictures.  You can find albums that are completely finished.  Add your photos and send to your favourite printer and that's it. 


You can take all of the time you have or make something, literally, in minutes even seconds.  Designers often sell gorgeous built up borders, clusters, word art and even stacked papers.  Add a couple of bits, your pictures and your finished.


Free stacked Princess Papers can be found here.  We plan on releasing all of the goodies, for free, eventually.

We design templates at The Cherry and they are really great for getting started.  You'll get a super idea about what kinds of shadows to use on your layouts as well as learn balance and aesthetic in layouts.  They are great for when you don't even know where to start or when your mojo is on low.


Here's a blog on with more on templates.

The basics:

OK, the obvious.  You need a computer, lap top or tablet. Of course, the better your internet, the quicker your goodies will download.  You'll need a considerable amount of storage on your computer because files can get pretty large.  Windows or Mac typically doesn't even come into play as a potential problem when it comes to digital scrapping.  I'm a Mac user and have never had a problem.  

A printer is ideal if you want to print out your layouts or projects.  I print almost everyday.  So make sure to consider this if you plan on printing out what you design. I'll blog about printers more in detail another time, but I'll quickly say that a lazer/LED printer is the way to go for when you want to print a lot.  I used to never print because of the crazy cost of ink.  My hubby bought me a printer that's ideal for printing in large quantities.  With my Brother printer, I can print over 2,000 pages before I have to refill!


This is an example of a hybrid.  Designed digitally, printed and assembled.

We'll take a look at software in a nutshell.

PSE or Photoshop Elements is a super software program to get started.  It's what I'm currently using.  It is a bit pricey at about $100.  Photoshop has been around for 20 years. So if longevity is a concern of yours, it's a pretty safe choice.  Photoshop is also an option if your very comfortable with computers and are not intimidated.  I always tease my scrappy sisters by saying, I'm still wearing my little girl under panties, by using PSE.  Hehehe...PSE is a bit more user friendly than PS when it comes to beginnings.

Corel PaintShop Pro is another very popular program.  It's really a matter of preference as far as I can see.  Some designers and other crafty chicks love PSE and PS while others are all about the PaintShop.  Though, both are at the higher end of the pricing scale.  These three are THE most popular for scrapbooking and designing.

My Memories Suite is another option and one I often tell folks to get started with.  It's mega easy to use.  So, if you're not uber wise with all of the technical computer stuff, then this would be a great option. They've been around for quite a few years. They have their own store, gallery and forum, too. No other software provider can say that, as far as I know.  They also have totally awesome customer service.  The kicker is, there is a free trial available.  You can play for an entire 30 days before you decide to buy.  Now, get ready for the cherry on top!  It's one of the cheapest software programs out there, too.  You can also find numerous tutorials and videos on their site as well as around the net. We can provide you with a coupon to save even more money.  Use this code STMMMS18837 and save $10 on the already low price of just $39.99.  They give a lot of freebies, too!  Here's the link for the free trial.

Before I know about digital scrapbooking, I was using Power Pointe because it was already on my computer and I was using it for designing slideshows and activity sheets for my high school students.  That's how I even thought about scrapbooking on the computer. I went out cruising the web, not even five years back and found the wonderful world of digital scrapbooking/design.

I went right for that free software from MyMemories, then bought the real deal and nearly two years later, bumped up to PSE.  I'm still there and have so much to learn before I take the even bigger jump into Photoshop.

You can use your digital program for so much more than scrapbooking.  You can edit your photos, design invitations, book marks, cards, boxes, stickers, planners, tags...the options are endless!


 tot free book marker
 This is a bookmark designed digitally and printed and laminated.  It's also free.  Find it here.

 tcot
 This is a greeting card, designed digitally.  Print and fold and you're finished.  It's free, too.  Find it here.


 tcot
This is my favourite, up-cycled Christmas card box gift.  All done digitally!  5 4x4 layouts and tags.  Find the tutorial here.


These are lovelies designed by my gal Paty Greif Digital Designer.  The things you can do, eh?

I still like to get glue and glitter on my fingers and I make the time to do both because they are still quite a bit different, but that creative, artsy aspect is in both.

Here's an example of a digital layout, printed at 8x8 and inserted in a standard scrapbooking album.  You can see the entire album along with tutorial by clicking on the image, below.


 hybrid mini and bow tutorial

I printed out my son's very own book.  He loves is so much.  I made this entire book from start to finish in an afternoon.  Find out more on how to make books like this, right here.


 tcot book tutorial

I'll leave you with one of our most recent hybrid projects and a favourite as well as popular.  It's these tea envelopes designed with Alexis Design Studio's Spot Of Tea digital kit.  Get the free envelopes here and click on the image to see more gorgeous goodies from Alexis Design Studio.


 sbg

There are a couple of blogs like this one explaining how to get started with digital scrapbooking as well as videos.  Here are some links that might help you further.

http://aliedwards.com/2010/01/getting-started-digital-scrapbooking
http://www.designerdigitals.com/digital-scrapbooking/GettingStarted.html
https://www.youtube.com/watch?v=sM91VckZjQg&gl=BE
http://www.makeandtakes.com/5-digital-scrapbooking-tips

Oh, how about a couple of free, digital goodies to get you going?  Check out our Free Digi Scrap Stuff board on Pinterest and download until your heart's content.  Be sure to check out our blog.  We have freebies on nearly every scrappy edition.  Our Facebook Page provides our fans with freebies every single day, too!  All of our goodies are for Personal Use ONLY. Meaning they are just for you and are not to be sold our claimed as your own.

Feel free to ask any questions you may have.  I've got scrappy sisters all over the world that can help. Thank you so much for stopping by The Cherry.

Monday, February 1, 2016

How To Get Your Kids To Listen

Welcome to The Cherry On Top,

On Monday's we take a break from crafting and dive into ways to help parents, teachers, family and friends how to deal with Autism.  We provide tips that have worked for us and a couple of others that we may not have tried, but seem to be great ideas.

We totally understand that the Autism spectrum is huge and not all of these tips might work with your kid, but if you're like us, we'll try anything at least once.  Sometimes techniques work right away, but stop working.  Other times a technique might take a while until we see it's effects.  Just don't give up.

We're looking at ways to help your children listen.  These tips are great for any kid or even for adults.  Some might be no brainers, but read through and try to implement as many as you can to see which ones work.


The very first tip is to stop doing what you're doing.

This might even be one of the harder tips.  Hehehe...  I only recently started doing this myself.  I have always been a mega multi tasker.  However, I noticed just how effective this tip works.  Who doesn't appreciate when someone puts everything aside and gives you their undivided attention?  What a nice thing to do to or for anyone at all times.  Especially, if you expect them to listen to you, when you speak.

For our Autistic boys it's different.  My youngest son with more symptoms needs a lot more than just me stopping what I'm doing.  While my other son can totally deal with it.


Physical Contact

I have found it most effective to actually look into his eyes and even better still, sit him on my lap, touch his shoulder or perhaps put my hand gently on his waist.  This works wonderfully even when they are older.

However, not all Autistic kids can handle this.  So use caution if you're not sure.  Some children or even adults do not like to look at folks who are speaking directly to them.  My youngest was like this and still has his moments where it is much easier to concentrate on what I'm saying if he doesn't have to look at me.  We certainly do NOT require our children to look at us when we speak.

I'm not sure how all kids are, but our youngest focuses so much on every detail of the face and how it moves that he cannot also digest what it is we are saying as well.  Which brings us to the next tip.


Use simple sentences.

This is not always easy, but it is often essential if you really want them to understand what you are saying.  Take a moment.  Gather your thoughts, then speak and always speak positively.  Avoid lectures.  Trust me, they will stop listening.

Speak evenly and softly.

Boy, is this one a tough one for me.  I grew up with a loud Archie Bunker kind of father, but I've learned over a lot of time, that this technique works wonderfully.  The more quietly I speak, the more they have to focus and listen.  Besides, even as adults, we often shut off if someone is shouting at us and kids are no different.  They stop listening.


Listen

It's only fair.  If you expect them to listen to you, then you should listen to them and prove you are listening by nodding or even better, repeat what they say or respond calmly using any of the tips above.  Always recognise their feelings.  This goes for anyone and it's a super lesson to learn.  What someone feels is all THEM and they are entitled to those feelings irregardless of what others think.  We might think it's silly or overboard, but it is what it is to them and we can't take that away.


Go To Them

If your child doesn't come the first time you call, don't shout even louder.  Go to them and make your point using the steps above.  It will show them an excellent example and save yourself a sore throat.

Check out this link at The Super Nanny.  They give some really awesome tips, too.

So try out these suggestions.  They all really work great.  Soon, they will become habit and you'll notice the house a bit a quieter and everyone less stressed.  As if?!  Hehehe...

Thanks for stopping by The Cherry.  We'll see you next week for more on Autism.