Tuesday, March 29, 2016

Huge Retiring Sale and Awesome Freebie

Welcome to The Cherry On Top.

Trying to play catch up after several small weekends away and now I'm trying to type on a European keyboard and it is going very slowly.  Hehehe...Anyway, today we are doing a flash back of a fabulous older collection from The Studio, Cafe In Paris.  Several of the designers there have gorgeous collections that are on sale at rock bottom prices.

We'll take a close up look at a couple of the designers goodies via layout love, we'll set you up with the links to grab these super duper deals and we'll give ya a couple of nifty gifties because it's just what we do.

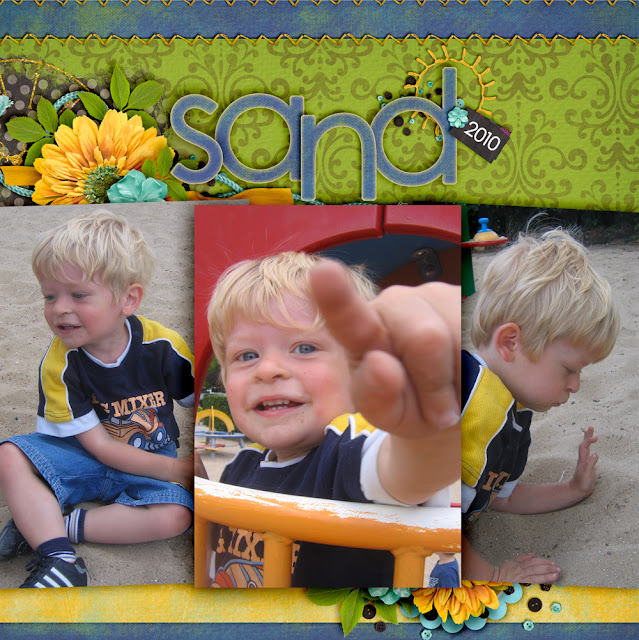
Starting off with my gal LouCee from, LouCee Creations, Across The Miles.  This kit really hit home with me because of course, most of family and friends are in the States while I'm in Belgium.  This is one of the few times my parents came to visit.  The boys just don't know what to do when they come, they are so excited.


I've got a couple of previews for you.  You can check out the rest at The Studio.  there are just too many to show!

 Louie Creations

This entire collection is under $5!

 Cafe in paris LouCee

I bought several of these collections and after working with the red and blue, I started searching some of the other colours to make this layout.


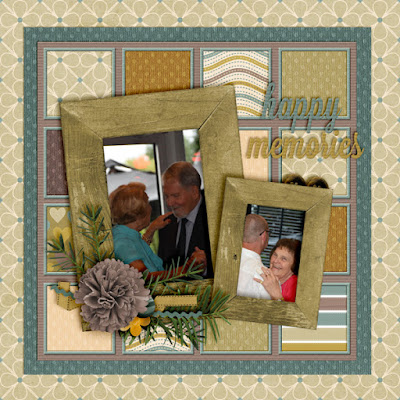
This layout uses mostly goodies from Aimee Harrison's collection.

 aimee harrison


 free

I loved these French goodies so much, I even designed a wall cover with them.  It's a pretty cool way to show off your lo's.


I love Paris!  It's only 2 hours away from Brussels.


More fun photos of Paris and this time using goodies from The Kit Cart.


That's all of the layout love I've got.  Let's check out the free stuff! How'z about a gorgeous frame cluster?  Right click to download and remember, it's for PERSONAL USE ONLY.


Thanks so much for checking out The Cherry.  I hope you swing by The Studio and pick up something from Cafe In Paris.  The prices are crazy!


Saturday, March 26, 2016

Free Easter Cup Cake Wrappers From The Cherry On Top

 Welcome to The Cherry On Top.

We are back for hybrid Saturday with more coordinating goodies from last week.  We had this really cute Easter basket last time and today, we've got cup cake and Easter Egg wrappers for you.  They are so easy to use and assemble.  Just right click and download which ever printables you like, print, cut and adhere.  You'll be ready in just a few short minutes.


I thought it'd be great to give you some plain cup cake and egg holders so you could use them for any occasion.  Right click to download.


This was my first attempt at creating a template for cupcake wrappers.  In PSE, I opened a blank document, duplicated the background, used the cookie shape of the thick circle, then cropped off the part not needed to get the basic shape.  Then I used April's goodies from our own design and GS Creations lovely templates to decorate the wrappers.

I didn't know which way the design was to suppose to go and my first attempt was backwards, but realised the upside down cupcake wrappers make the perfect egg holders.  Hehehe...  I fixed them and changed the design just a touch because I forgot to save a tiff or psd format.  Duh!  I always forget to save in the right format.

Here's a look at our basket and another hybrid project from last year featuring BooomersGirl Designs.  Click on the image to see it.

 The Cherry On Top

Don't forget, our freebies are for PERSONAL USE ONLY.  They are not to be resold or claimed as your own.

Thanks so much for joining us for Hybrid Saturday.  Make sure ya get crafty this weekend!

If you are looking for more great freebies from The Cherry, visit our Pinterest board to see them all!


Friday, March 25, 2016

Don't Take Those Templates So Literally and A Free One


Welcome to Freebie Friday at The Cherry On Top.

We've got the last template from the Caterpillar series.  Whoo hoo!  Let's check out some super scrappy sister inspiration and grab that new download.

If ya scroll through our blog, you'll see we often blog about templates.  They make scrapping super easy, they save a ton of time and they are also great for when you're creative mojo is running on low.  In the beginning of my digital scrap, I didn't even know how to use templates.  I used them as a sketch.  Then finally a scrappy sister told me about control "G" hehehe...I'm still learning very, very slowly, but I am moving forward and when I find new tips and tricks, I share them here, with you.


One way you can use this template is by showing a lovely landscape like Poki did here, above.  The interruption in the photo is not intrusive and each box runs smoothly into the next.

Below, a larger photo was used and the template works great for that, too.


Here's another from Robyn, with yet even another way to use the template.  Put a different photo in each box.

Want to learn more about templates and how to use them?  Click here.


If all of those boxes are making you batty, ditch them!  That's what I did in my layout.  Replace all of those boxes with one sweet photo.  What a fantastic thing, templates are?!  So very flexible.


Well, all righty then!  You should have all four, free templates now.  Do'cha just love our free templates?  Yes?  Then leave us some love when you download.  There is nothing more motivating than a nice complement and a thank you.

free template from the Cherry ON Top

We know ya love quick pages, too.  Did you grab this one from Tuesday?

free quick page

If this is your first time at The Cherry and you are loving all of the freebies, then you'll love us on Pinterest and Facebook where we post free stuff every single day!  Make sure you join us there.

We want to thank you for stopping by The Cherry.  Make sure ya do it, again!

Tuesday, March 22, 2016

Happy Me, Free Quick Page

Welcome to The Cherry On Top.

We are back with more fabulous freebies and goodies from MagsGraphic Designs.  Scroll on down for inspiration, tips and your free quick page using Happy Me from MagsGraphic Designs.


Such a warm soft palette.  It'd be great to scrap up pictures with a masculine subject, too.  A touch of nature and boy, do I love those squares!  I layered the basic square element with coordinating papers from the kit.  Then I copied the background of my layers in PSE11 and clipped in all of the other coordinating papers from the kit.  Tip: It goes so much faster when you design your layout like a template and clip in your photos and papers.  Otherwise, you're stuck cropping and recropping until you get the perfect fit.


When you get a cool template with all of those squares, there's so much you can do with it.  Tip:  You can put a picture in each square, in a couple of squares or don't use any pictures in them, like I did here.  Show off all of those fabulous papers if you have them.  Use the squared template as a background or make it a feature.  Wouldn't it be awesome on a card?  Shrink it up, enlarge it, layer it up, add bling or use each square for progressional years photos of your kids and or loved ones.  My boys love to see this kind of progression.

Here's a look at the kit.  It's all linked up to Maggie's store.  You may want to check out her blog, too. She's got plenty of freebies from other kits there as well as more great inspiration from the Creative Team.  There's a gallery page where we chat, get exclusive freebies, share our layouts and have a laugh.  Join us there!

 Happy Me

The quick page is all set to download in a png format.  Simply right click and save to your downloads.  As always, our freebies are for PERSONAL USE ONLY and are not to be resold or claimed as your own.

Consider Following us, so you don't miss out on all of this free stuff.  Like us on Facebook, where we post freebies every single day and on Pinterest, too!

Thanks a million for stopping by The Cherry!


Monday, March 21, 2016

Getting Kids To Do Their Home Work

Welcome to The Cherry On Top.

We are continuing on the subject of homework from last week, where we wrote about IEP's and how they can help, professionally diagnosed students limit homework and adjust in class work if necessary.  

We'll share some research we've found about homework and tackle those homework issues you may have at home.

There has been a lot of research done on the effectiveness of homework.  In a nutshell, homework for elementary aged students provides very little educational gains on average.  The numbers are out there along with numerous reports on this.  As an educator, it saddens me that some educational experts are not taking this in.

My oldest son comes home, every single day with homework and has been since he's 6 years old.  This makes him extremely bitter towards school, which already is a terrible situation.  The shouting matches and tears were just one part of it.  As you may also experience in your autistic or ADHD kids, it can take ages to do one small assignment.

The kids are finally home after a long day of sitting behind a desk and now they have to sit behind the table and do even more work, despite their success and attainment of that knowledge in the class.  My youngest brings home mostly busy work and he also loathes homework.

I found a useful report on this study at Educational Leadership where they gave a synopsis of gathered information.  To put it simply, the older the child, the more gains they get by doing homework.  Although, those gains were still relatively minimal.  We are just generally speaking for the sake of keeping this short, but you can read the report for yourself.

If you are a parent who thinks homework is necessary, despite what research has proven, you can always have your kids read or do fun science projects and conduct your own homework routine.  Another point raised is homework as a means of teaching responsibility.  My response would be, use chores as a means to teach responsibility at home.  It makes sense to keep tasks that are relevant.  Educational responsibilities are kept mostly at school, while home responsibilities are kept there.

I found these guidelines from Educational Leadership to be very useful.

Research-Based Homework Guidelines


Research provides strong evidence that, when used appropriately, homework benefits student achievement. To make sure that homework is appropriate, teachers should follow these guidelines:
  • Assign purposeful homework. Legitimate purposes for homework include introducing new content, practicing a skill or process that students can do independently but not fluently, elaborating on information that has been addressed in class to deepen students' knowledge, and providing opportunities for students to explore topics of their own interest.
  • Design homework to maximize the chances that students will complete it. For example, ensure that homework is at the appropriate level of difficulty. Students should be able to complete homework assignments independently with relatively high success rates, but they should still find the assignments challenging enough to be interesting.
  • Involve parents in appropriate ways (for example, as a sounding board to help students summarize what they learned from the homework) without requiring parents to act as teachers or to police students' homework completion.
  • Carefully monitor the amount of homework assigned so that it is appropriate to students' age levels and does not take too much time away from other home activities.

If you're stuck like us, giving daily, mundane, homework assignments to kids who hate school to begin with, consider these techniques and tips:

-  Let the kids play for a half hour or so and unwind after school (if time   permits).

-  Use a timer to keep them on task.  (We spoke explicitly about this in a previous blog.  Click here to read more about timers.  They can be very effective.)

-  We always say no TV or game time until your homework is finished.  (We also have a blog touching on this and provide you with a useful chart.  Click here.)

-  If you have an IEP, make sure that homework is a part of it.  This was a major help for us.

-  Sit with or around your kids while they do their homework.

-  Provide a treat of fruit and cookies while they work. (This really helps me get them seated and started.)

-  Provide an area where homework is always to be done and make sure it has limited distractions.

-  Explain to the teacher your at home experience and show them the research we shared here and remind them of the IEP.

-  As we always encourage our readers, stick to your guns!  It's so much easier for everyone when we stick with the routine and keep them black and white.  There is little room for arguing.

This is one hot topic and I suppose you could find convincing enough information out there depending on the side you choose to believe or go with, but this is the way we thought was most convincing and judging on our experience, it seems to be true, that homework has very little effect on educational gains with younger students and can even have a negative effect, at that.

We hope we've been of help and that you'll join us next week where we'll be talking about the power of hugs.

Best of luck!

Saturday, March 19, 2016

Hybrid Saturday, Easter Basket

Welcome to The Cherry On Top's, Hybrid Saturdays!

We've got this frolic, paper Easter basket for you, some ideas on what to put in it and a couple of other fun, Easter projects.

Download this free template for the basket, find out how to put it all together, enjoy our festive ideas and get creative this weekend.


This project is an absolute breeze.  Made literally, in minutes and with very few supplies.

Supplies:

-  template
-  printer
-  paper
-  scissors
-  glue or adhesive
-  goodies for inside

Tutorial:

-  download the template by right clicking on the below image
-  print to your desired size 
-  cut all along the dark edges for both the basket and handle
-  fold over the four tabs where the dashed lines are indicated
-  adhere the tabs to the inside of your basket
-  adhere the handle to either the inside or outside of your basket
-  I suggest cutting the template so that you don't see the black lines.


How easy is that?!  A couple of extra tips.

Tips:

-  the heavier the items inside, the heavier your paper should be
-  we provided you with decorative tips on your handle so adhere to the outside
-  use the template and trace around any paper you choose

Let's think about some of the things you could put in your basket.  Any type of small items, lighter goodies will be just fine. I used these plastic eggs filled with sweet treats and a coupon for a free Application for the boys gaming habit.  If you'd also like the coupon, scroll further and click on that image.

Money, gift cards, small toys like slinkies, yoyo's, Army men, make up, rolled up socks, jewellery, even a new gsm and other small electronics will fit.   Toy cars, Legos, marbles, Nurf Bullets...We've got an Easter board on Pinterest with all kinds of crafts, more gift ideas, kid's games, activities and even more. 

Check out our other Easter hybrids.

I designed this last year using BoomersGirl Designs.  Get the full tutorial by clicking on the image.  There's also a card option!

 Easter Hybrid

We've also reinstalled these tags from last year over on Facebook Page.


Here's that coupon.  Click on the image to get the larger download.

 coupon for free App

Remember, all of our freebies are for personal use ONLY.

If you are a fan of freebies and hybrids, then make sure you check out previous blogs to see what you may have missed or you could hit up our board on Pinterest, The Cherry On Top's Freebies and see them all in one place.

We'll be back next week with more hybrid fun and of course, more freebies.

Thanks so much for hanging with The Cherry!


Friday, March 18, 2016

More Templates For Freebie Friday

Welcome to Freebie Friday at The Cherry On Top!

We are back with yet another fabulous Caterpillar template this week.  Keep on scrolling to see all of this beautiful inspiration from me and a few of my top Scrappy Sisters.  Then grab your download and get scrapping this weekend.

Here's an example of how you can use today's free template.  I used Aimee Harrison's kit, Bookish and my kitty.


Here's another example of how you can use the template from today.  I used again, Aimee Harrison Designs, My Happiness.  This collection is beyond fabulous and I'll tell you, I left out all of the many girly elements and still came up with something boyish and fantastic.  How awesome is that?!


This is last week's template and of course, you can still grab it!  We leave up our freebies as long as possible.  

free template

This was the first free template in the series and it too is still available.  You can use all of these templates as quick pages if you like.  How cool is that?!

free template


Check out what some of the other ladies have done with The Cherry's free, Caterpillar templates.


We've got one more template left in this series.  Keep your eyes out for it! Click on this image to get today's, free template.

free template

If templates are your THANG, then make sure you grab this beauty.  You can also hit up our Pinterest  board, The Cherry On Top's Freebies and get the ones that are still live.

free template

All of our freebies are for personal use ONLY.  If you'd like to have the commercial use version, make a request and I'll set you up.

We'll be back tomorrow with another fabulous hybrid project you won't wanna miss.  See you then!


Wednesday, March 16, 2016

Free Time Line Cover From Paty Greif and The Cherry On Top

Welcome to The Cherry On Top.

It isn't Freebie Friday yet, but we've got a sweet one for you.  Paty Greif Digital Designer has teamed up with Just Because Studio to create a fabulous collection, Good Luck.

Keep scrolling to see the inspiration and grab that free time line!


I couldn't resist playing with the collection after I designed the time line cover.  I like to have my images coordinate on my social sites. This collection is on a promotion, but not for long.  So head over to PickleBerryPop and grab it.

 Good Luck

Hop over to Paty's page and pimp up your wall photo with a festive, fun design!

 Paty Greif FB freebie

You can find this one on Paty's blog!

 freebie


Come on back on Friday for more freebies and Saturday for a new hybrid freebie.  I'm thinking bunny-ish.  Hehehe...

Thanks so much for stopping by The Cherry!

Monday, March 14, 2016

How an Individualised Education Program Can Work For You

Welcome to The Cherry On Top.

On Mondays we talk Autism.  We realise how difficult it is to get condensed, easy to read, geared for a general population and possible solutions all wrapped up in one cohesive, short post.  That's our goal on Mondays.

I've done a touch of research on IEP's (Individualised Educational Program) because we also use the Belgian version of this in connection to homework.  I'd like to bring to the table, the information I found on the necessity of homework according to research and provide tips on minimising stress due to homework, exams and lengthy assignments, which through an IEP can be configured.


Let's start off looking at what an IEP is. An Individualised Educational Plan is a plan or program developed to ensure that a person with a legally identified disability receives specialised instruction and related services.

That means that the person has to be professionally evaluated, eligibility needs to be decided by qualified professionals, a meeting is called with the IEP Team and sometimes with the parents and teachers.  Our team in Belgium, consists of the parents, the school's councillor, a governmental representative for our region and an Autism professional and mentor.  Services are then provided, progress is reported, the IEP is reviewed and the child is later reevaluated.

Some parents do not feel comfortable admitting to a disability.  I would hope that pride would not come before education.  Perhaps the thought of labelling someone is also stigmatic.  Carefully consider the true and I stress how important it is to be honest with ones self about being realistic in regards to the limitations of your children or students.  Do not allow expectation to cloud what is actually relevant.  This is a huge problem we face.


I'm thrilled to have an IEP for our kids.  Our youngest goes to a special Autism school because he's already been through the professional diagnosis and cannot attend a regular public school due to his disabilities.  Our oldest, also professionally identified can attend a regular public school.  However, it is very challenging and stressful for him. Homework, tests and lengthy assignments are a huge burden and bring on many symptoms of Autism.  Thanks to an IEP, not only can our child remain in a regular public school, but he can also get some help.

If you are certain that your child is intellectually capable of handling the basic educational academic syllabus and you really want them to remain in a regular public school, than an IEP might be just what you need to make that happen. 

The research I've done on homework has provided this basic outline:

Homework on an elementary level has proven to be ineffective.  However, homework given to older students, in their last few years of school has proven to be very effective.  That's it in a nut shell.

I have observed that much of the homework given my boys is just busy work.  As if the teacher is required to give them homework.  My youngest has been able to count to 100 before he could even start school, yet every week he comes home with a task of filling in missing numbers from 1-100.  Proving my point on homework just being busy work, at times.


My oldest can come home with hours of homework, doing drill after drill over an exercise that he fully understood and comprehended since the third problem.  After many tears, shouting matches and a hatred for school, we attended our next IEP meeting with the plan on minimising homework and we could do this because of the IEP.

We made an arrangement, begrudgingly with the juf/teacher to monitor his homework and when it was too much, to pull out the most difficult tasks and if he could do them successfully, he no longer needed to continue.  We also recommend, when administrating lengthy examinations, that they either give one sheet at a time or only part of the exam.  When handed a booklet of page after page of testing, our son would shut down before he even started, despite the fact that he could totally do the work.  Seriously, wouldn't this even be stressful for any kid?

Breaking down the work.  Concentrating the work.  Has been a huge help.  It is more work for the teachers and you will more than likely find it difficult to get them to work with you, but through an IEP, it is legally binding.  So stand your ground!  Fight for what you know is best for your child, not what is easiest for the teacher.

For teachers, I recommend the above steps as well as keeping an open mind.  As an educator it is detrimental to remain open minded and flexible.  It will be one hell of an example for your students to show them patience, kindness and an understanding that we are all very different and that some people require a different approach.  This is true intellectualism, which his what educators should embody.

Teaching kids with IEP's is not easy work.  However,  the instructor can also learn from the experience and apply that experience not only to another pupil with an IEP, but perhaps for a student without an IEP or even better still apply it to the class because you've seen it work.

We hope this edition has been helpful.  Feel free to share your stories in the comments.  Keep it sweet and simple as we have for you.

Next week, we'll take that homework research out of the nutshell and discuss ways to get your kids to get it finished.

The best of luck!


Saturday, March 12, 2016

My Happiness, Hybrid Freebie Saturday

Welcome to Hybrid Saturday with The Cherry On Top.

You are going to love today's hybrid project.  I'll be showing off Aimee Harrison's, My Happiness 360 Collection.  Is it not just a breath of fresh air with mega sunshine?!  Such vivid colours, full of life and inspiration.

Aimee's 360 collections are super for your journals and planners, too.  See what we did with last month's here.  It's awesome.

I paired up Aimee's, My happiness with a fabulous template from Heartstrings Scrap Art to design this layout.  As mentioned in an earlier blog this week, I used scrapped a good friend's daughter to show off all of this wonderful pink.  She's such a cutie.

This background made a neat, homemade quilt feel.


 My Happiness

Can you even believe this is the same kit?!  I absolutely love when a kit has versatility like this.  There were a lot of non pink goodies in this collection.  So, if you're an all boy scrapper, no worries.

This layout was designed using one of our free templates.  Keep your eyes out for it. It's the third free template in the series and the first and second are already available for you.

 Why Happiness

This is the hybrid.  Can you guess what it is?

It's a pinwheel!  Simply, right click, download, print, fold over every other corner, fasten and you're set.  This project can be finished in less than five minutes from start to finish!  Ya gotta love that.  

I used a glue stick that dries really fast.

If you want your pinwheel to turn, then you'll have to poke a small hole through the middle and attach it to something like a straw, or paper straw with a tack or pin.  You can print it out large or small and consider using it on a card or in a traditional style layout.

I left that flower with butterfly as your centre, if you like.  I took the very edges of my flower and carefully, pushed them up a bit to give mine a more dimensional effect.

You  might also decide to do front and back.  You can even choose which side you like best and go from there.  If you like the differentiating colours, then you can go with the side without the circle.  You can print back to back or you could use some coordinating scrap paper and glue it to the back and go from there.  I did all of these options and they looked great.  Big, small, white back, coloured back, front side and back side and they all came out fantastic.


You could even print this out and trace the template on to the paper of your choosing.  This kind of versatilely makes crafting so much fun!

If you need a really in-depth tutorial on how to do this.  Check out this one.  

My tutorial is for decorative pin wheels that don't turn.  I saw them once in a vase like a bouquet.  Sweet!


So, I glued the printed out version onto coordinating paper from my stash, then cut it out.


If you want to stamp or brush around the edges, now is the time.

Use adhesive on the corners of your wheel.


Fold back every other one like illustrated.


I used a large, flat glue dot to adhere mine since I wasn't using it as one that spins.  If you are use something that a pin will go through, glue would be great if it can hold the force of the fold.


Almost there!


 Voila!

  
Choose what side you like best if it is going to be used for decorative purposes.


You can use straws, chop sticks...I used the stick from a McDonald's balloon.  Hehehe... I always keep them from the grocer's, too.

If you have nothing, consider a paper straw.  They are made in seconds.


Take a piece of paper and cut in half diagonally, as shown.  If you have a 12x12 it'll be a nice, big one.


Start at the small point and just roll as tightly as you can.  Don't worry if it isn't perfect in the beginning.  It's on the inside and you won't see it.


When you get to the end, glue down your edge.


There it is.  Cut off your edges and you're set.


Tah, dah!


I used another large glue dot to adhere my straw.


Just use a glue dot to adhere.


I liked the black edges on this one.  So, I left them in tact and added a fun card stock button.


Here's my balloon stick.  Excuse the mess that is my craft area.  I left my ribbon right on the rack/pants hanger that serves as my organiser.  Hehehe...I used a tiny glue dot at the top and bottom of the stick, stuck the end of the ribbon on it and slowly wound around my stick.  Seconds until finished!


Another glue dot to adhere.  Now my stick isn't so plain.


This is what the pinwheel looks like on one side.  I made it smaller for on a layout.


You can see the difference in sides with this image.


Here are all three finished products.


This one came out a nice, large size and the stick looks so great!


Thanks so much for joining us this Hybrid Saturday.  Check out our previous hybrids if that's your thing or hit up our Pinterst board to see all of the other kinds of projects we do at The Cherry, both digital and traditional.

Remember all of our goodies are for Personal Use ONLY.  Do not resell them or claim them as your own.  If you download, leave us some love, Pin and or Share.  It's the best way to say thank you.

Happy crafting!