Thursday, September 22, 2016

The Cherry On Top's Most Popular Paper Projects


Welcome to Throw Back Thursday with The Cherry On Top.

We're not throwing it back too far with this week's photo.  That's me with my boys just three years ago.  My oldest is passed my nose, now!  Hehehe...

We are going pretty far back with our projects we've got on tap, today.  This morning, I went through all 400+ blogs I've done so far to see which ones got the most views.  I was thrilled to see my traditional paper projects won the prize.  I really work hard on these templates and it's great to see the hard work paid off.  They are also three of my all time favourite projects to date.  Check them out and make them your favourite, too.


All of these projects are easy on your pocket and can be whipped up rather quickly making them very doable for just about anyone. I've also included step by step tutorials as well as free templates for very efficient crafting.

I really love this paper apron.  I made it for Mother's Day and included these laminated recipe cards to fit in the pocket.  They are our family's favourites. This can be hung up or free standing.  It might look difficult, but with our step by step tutorial, you'll do a great job, no matter your skill level.

 The Cherry On Top's Terrific Paper Apron with Free Template

I have made so many of these tiny top hats.  Hehehe...  You only need very few supplies to make something spectacular because they are small, they require little embellishing.

Go formal and conservative or...

 top hat, free tutorial and template from The Cherry On Top

go all out bold and bodacious!


This darling here is our #1!  It's the most viewed blog we have to date, tripling the amount of views.  It's also an older entry, but it is a dandy.

 paper dress tutorial from The Cherry On Top

Check out the tutorial and you may be surprised how easily this lovely soft, paper dress was made.

Here's another example of a paper dress.  I've made digital templates so you can use the dresses digitally or traditionally.  Read through our instructions and see how they best fit your crafting needs.

digitally scrapped

traditionally scrapped
 free paper and digital dress template from The Cherry On Top

We'll be back for Freebie Friday.  We've got a monster of a goody waiting for you.

Here is what we had for Traditional Tuesday:

Up Cycled Christmas cards made in a flash.  Join The Cherry and have those cards ready for delivery!


Thanks so much for hanging with The Cherry!


Tuesday, September 20, 2016

Traditional Card Making With Scraps and Old Cards

Welcome to Traditional Scrap Tuesday with The Cherry On Top.

We started making cards for in our card box last week and we're continuing with that this week.  I've been crafting forever and have come to the point that I want more of my projects to be useful.  I have enough creations sitting in the attic gathering dust.  I'm on a mission to scrap with purpose and I'm sharing those ideas with you.

We're getting several birds with one stone with our latest designs.  Using old Christmas cards, scrap pieces from our stash as well as non conventional goodies to scrap or craft with.  This will save you money and it's better for the environment, too.

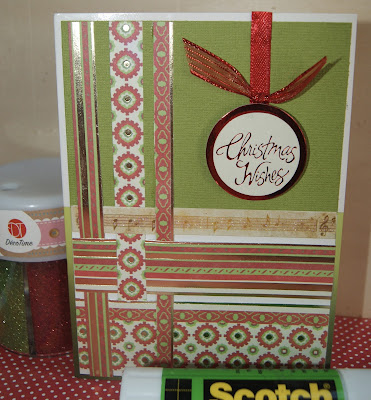
Today's project is this up cycled Christmas card.  Keep reading through the tutorial with tips and tricks to scrap fast, efficient, inexpensively and with green in mind.


This was last week's card.  You can click on the image for the tutorial.

 up cycled card

This is the card we are upgrading.  It's just lovely on the outside and I didn't change it a bit.


Here's the inside.  

I've eyed up a window spot so that I can leave the sentiment and cover the rest.  I put the piece of scrap over the writing spot and held it up to the light so I could see that I had it directly over the journaling.


Take a piece of paper you want to use, turn it over.


Then lightly scribble across the underlying paper to see exactly where the box is that needs extracting.  Easy, right?


Use either an exacto knife or a paper cutter to cut out the window.


Turn your paper over and make sure the box is just right.  Apply your adhesive and place it just right.  Start covering the rest of the card or at least where there is writing, with pieces of coordinating scrap. Personally, I think colours make or break a good project.  Using collections is THE best way to get a good cohesive look in any project.  Make sure the colours match as closely as possible.


Here are some more strips to cut.  Consider placement and pattern.  The main page is basically white so I used strips with mostly other colours than white.  In this case, red.  This gives the card a balanced look.


I used these nifty sticker ribbons or edges in this overlapping "L" shaped form for the basis of my cluster.


More coordinating goodies from the discount store.  These lovely large brads are perfect.  I used my wire cutter to ditch the fastener.


Then applied this huge, thick glue dot.  I believe it's a Zots brand and it is truly the best glue dot I've used to date.  These large ones add dimension and the sticking power is fantastic.  They even survive the fluctuating temperatures in my attic.


I need a few more layers in my cluster.  I went for some ribbon that matched sweetly.  A printed or patterned ribbon would have made the look too busy.  Plain ribbon would be best on this pattern paper and the ribbon gives the card a nice, soft textural feel.


That's it!  Not a penny spent for this card.  I used all stuff from last year and scrapped up this card in under 30 minutes.


Scrap efficiently, cost effectively and keep the environment in mind and you'll feel good about your projects.  Find out how by following our tips.  Have a project in mind, look for a template to follow before you begin grabbing goodies and this will save you a lot of time behind the desk which is why a lot of people don't scrap.  If you can save time, you'll find the time to scrap more.  Let us show you how!

Thanks so much for checking out The Cherry.  We'll be back with more purposeful scrapping next week.

Saturday, September 17, 2016

Mini Scrapbooks Made In Minutes With Free Templates

Welcome to The Cherry On Top.

We're back with more hybrid Saturday madness.  I've got layout love, a mini tutorial, a free template and a boat load of links for more awesome hybrid projects with free templates.

I am in love with Key Lim Digi Designs kit, Bermuda Shorts.  These awesome colours are totally mah' thang.  They echo summer fun so I've cooked up a fun mini album you can make with just one piece of paper and very little time is required.  Oh, yeah!


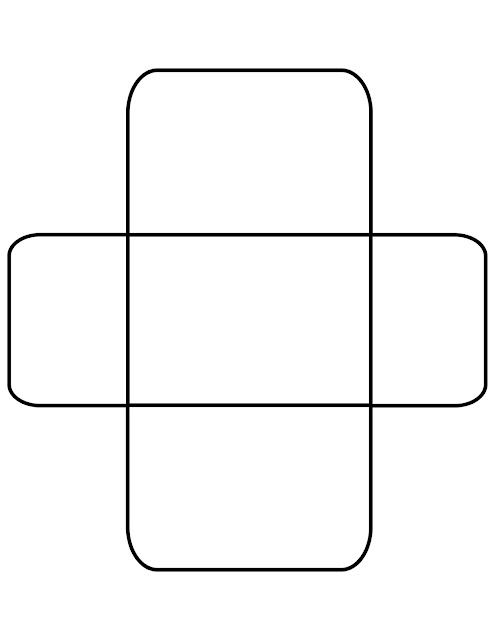
Here's a look at the template.  A super, basic template.  You can print it out and trace around it if you like or you can download the tif and or psd files and do it up DigiStyle like I did here.  Of course you can mix and match.  Do the basic layout on the computer, print it out and embellish until your heart is content.

I've designed this template so if you print it out as is, it should fit on standard size U.S. and International paper.

A tip you may want to consider, is the thick black lines.  If you're savvy enough, you can delete the layer style in the tif and psd version if you don't want these heavy lines.
 free template for a folding mini album

Do one digital page and add in your paper of choice for one side.  As you can see, I also added a little embellishment so I could get the size just right.  I printed the cluster out separately and added it to the album at the end.


Here is just one idea you can use.  I simply cropped in fun summer photos in each piece of the template and added very few elements to the centre picture.  All digitally, of course.

You could scrap up the entire template digitally if you'd prefer.

This particular method pictured will make scrapping very fast.


I recommend printing front and back if your printer has that feature.  Otherwise, print out both pages, cut it out and then glue them back to back.

Here it is printed and cut out.


Here's the other side.


I often use a tiny glue dot to close my mini's.


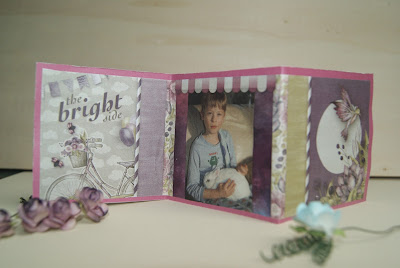
 Here it is, all scrapped up and ready to go.


If you're looking for more easy mini albums.  We've got ya covered.  Check out some of our previous projects.  Each preview is linked up to the blog with the tutorial and free template.  How great is that?!


We did a traditional scrap as well as a digital scrap with this template.

 Free Folding Mini Scrap Album Template

This mini came out so cool.  I put in a pocket on the last page for some cash.  So my niece got a fun album of herself, friends and family and it served as a card and money holder.

 Free Template for Mini Album

This is another very fast project.  It's an accordion style mini.

 Easy Accordion Album

This is absolutely my all time favourite mini project to date!  It's a wallet that serves as a mini album (if you choose), a gift card holder and or money holder.  It's just like a wallet only made of paper.  I've got a manly version of this, a Minecraft version and this lovely girly edition.  You totally HAVE to do this!

 Free Wallet/Gift/Money Card Template

This little doozy is a very small accordion style mini that fits neatly into a large match box.  Talk about recycling.  I used various goodies from Graphic 45 for this one.  Take a look at the tutorial and give it a try.

 Accordion Mini with Graphic 45

So, how's that for mini madness?!  I told ya we've got you covered.

Thanks so much for taking a peep at The Cherry.  We invite you to sit back and scroll through previous entries to see all of the mazing freebies and inspiration you've missed.

If you really like what you see join us on Facebook and follow us here and on Pinterest.

Remember all of our freebies are for Personal Use ONLY.  Contact us if you'd like to use our goods for Commercial purposes.

Happy scrapping!

Friday, September 16, 2016

Free Word Art from The Cherry On Top and LouCee Creations

 Welcome to Freebie Friday.

I've got templates, inspiration, a new collection, a freebie and dino's.  Keep reading, get inspired, grab the freebie and check out LouCee Creation's new collection, DinoRawr.

In the summer I purchased this plush dinosaur for my youngest.  He doesn't usually "do" stuff toys, but for some reason, he really took to this dino.  Totally worth the $2!  Hehehe...  He takes it absolutely everywhere and you rarely see him without his Dino Rock.

I have plenty of pictures due to this attachment and now Dino Rock is nearly as much a digital star as JJ.  Hehehe...

I'm crazy about kits where I can show off my boys in fun fashion and DinoRawr is perfect for that.  LouCee teamed up with my gal Paty Greif.  Paty sells Commercial Use goodies often in the form of these lovely doodle cartoons that you see here.  LouCee worked her magic giving them beautiful colour and she's brought them to life in this lovely collection.

This layout uses a digital template from Lissy Kay Designs, You and I Kit 2.  Lissy has awesome templates.  They make scrapping very fast.  Use them as a sketch, go literal or mix it up.


I wanted to show off LouCee's packaged clusters.  At the bottom of this layout you see a very nice, large cluster with two photo inserts.  These clusters make scrapping unbelievably fast.  I've got a tiny tutorial to demonstrate how you can scrap a lovely layout like this in under 10 minutes.


Start a blank page and plop in your cluster where you'd like it.


Duplicate your background layer and make matting or layers like you see here.  Then crop in your papers.


I always duplicate the background and fit it in photo spots like these.  It will save you from cropping and recropping, over and over until you the get perfect fit, saving you even more time.


There!  Three photo spots all ready for the nifty pictures.  Place you photo over the spot you want, create your clipping mask and adjust as needed.


Now, that is scrapping fast!  I repeated a few of the embellishments from the big cluster in my cluster at the top of the page.  Scroll up to see it.


I felt guilty with this layout.  Scrapped up in 7 minutes.  Yes, I know.  I'm a true nerd.  I often time how long it takes for my layouts.  Especially, when I want to prove how fast digital scrapbooking can be.  I'm using our free word art in this layout.

There's Dino Rock, again.  This time he's going Poke-Hunting!


Here is you freebie for today.  It's for Personal Use ONLY.

 free word art from The Cherry On Top

Thanks so much for stopping by The Cherry.  We'll see you tomorrow for hybrid Saturday.  We've got a lovely folding mini album that uses only one sheet of paper and it's put together in a flash.  It could be used for traditional scrapbooking as well.  There's a free template, too!

Does The Cherry rock or what?!  Yeah?  Then follow us on Pinterest and Facebook and get freebies every single day.

I hope you have a super scrappy weekend!


Thursday, September 15, 2016

Throw Back Thursday's Artsy Fartsy Template Freebie

Welcome to The Cherry On Top's Throw Back Thursday.

On Thursdays, we show off some old or in this case, older photos as well as remind you or introduce you to a freebie you may have missed.  Isn't that great?!

This little cow boy is probably double the size he is here.  He's only 11 now, but his feet are two sizes bigger than mine, already.  OK, I'm no giant and I do have smallish feet.  Hehehe...


I was scanning through Pinterest one fine morning and came across some multi media art that I just loved and I used it as my inspiration for this layout.  It took me so long to get this just right, I thought I'd better turn it into a template so all that hard work got spread out a bit.  Hehehe...You won't believe what some of my scrappy sisters did with this template.  Click on either this image or the preview below to get to the blog with the free download link and much more layout love.

 free template from The Cherry On Top

This is what the template looks like.  Not our "normal" thing, but that's a good thing, right?

 Free Template From The Cherry On Top

So, what else have you missed?  

Did you know we share freebies on this blog at least 3 times a week?  If you follow us on Pinterest and or Facebook, you'll see several freebies every single day.  We dare you to try to keep up!

Thanks for throwing it back with The Cherry!