
Welcome to a DIY edition of The Cherry On Top.
Piñatas are not popular in Europe, so I'm finding. I want to bring it to life, here. One of the best things about a party is the piñata. I have childhood memories of them and they are very fond. My kid saw the concept on a TV show and said he wanted one for his birthday. Since he is a fan of Minecraft, I had to go for the Creeper Piñata.
Hit up the Party Ideas board on Pinterest for more piñata ideas. Here are just a couple more. I've already made a template for this one! Be looking for a future blog.
I fist checked out to see if I could purchase one here, in Belgium and found a store in the area that sold them for 25 Euros, unfilled. So at least another 15 Euros or so to fill it and I'm talking about 40 Euros or just under $45 for something that was going to battered and broken and I really don't think the kids care all that much waht is in the piñata besides the candy. Hmmm...
Hitting up Pinterest first, I found some cool ideas, researched the basic construction, glue recipe and came up with a much easier, faster and cheaper way to make this Creeper (from Minecraft) piñata. I want to credit The Coupon Closet for the spark. I took their idea and made it a heck of a lot easier.
This piñata took me under two hours to make from start to finish and with a lot of interruptions in-between.

Here is what you will need:
2 paper bags, whatever size you want.
coloured paper (greens and black for a creeper) for the outside
paper cutter or scissors
light weight candy
light weight toys or other stuffers if you choose
balloons and confetti
1/2 cup flour
3/4 cup water
pastry brush
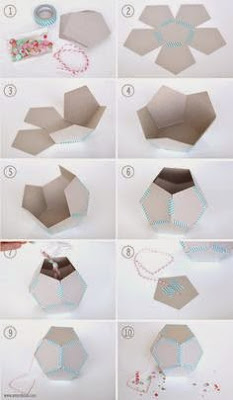
I keep all of these lovely paper bags from retailers. They come in so handy. I found two nice sized, bigger bags that fit perfectly into one another. They really were not all that rigid as you can tell from the image. They were not coated and there was no plastic in any component. In the beginning I was worried that it wasn't going to hold the stuff inside. I simply folded inward, the handles for the inside bag.

Then I did a forehead slap and thought, I'll put all kinds of light stuff in there to keep the weight of the piñata down. Take a look at all of the light weight goodies I put in there. I took all of the packaging off that I could as well.
I recycled stuff that my boys didn't like or use or things we had doubles of. FYI, those little parachute dudes were a huge hit for the boys of this party. They were between the ages of 7-11. Glow bracelets, whoopee cushions (always a hit), Pez dispenser filled...Think light as possible.
Here's a link to a blog that has a list of non candy ideas for piñatas.

I never buy candy. I don't have to because everyone else does. I used candy that we already had in the cabinet. I chose the lightest candy from the bunch and still had a ton left over. There was a sweet variety of spek which are those pink marshmallows you see, chocolate cents, a few lollies and just a couple of other small, light candy to help fill up the bag, balloons and confetti. All seriously light things. You could always put in coupons, gift cards even a couple of dollars or paper money. I thought a 5 Euro bill would be cool or a coupon for a night's stay at our place.

After filling it, I checked to make sure the bag still fit nicely inside each other. No problem! Lift up your piñata by the handles and make sure they are going to hold all of your goodies. You could consider extra reinforcement on them. I didn't need any.

I hit up my colored paper stash and grabbed green and black as well as my paper cutter and scissors. I folded standard a4 sized paper in fours and cut, but the size really doesn't matter because you have to overlap anyway.

Then made the glue of flour of water. I used a half a cup of flour and 3/4 cup water. I just blended until I had a decent consistency having no idea at all of just what a decent consistency was. Hehehe...Not too thick. Not too thin. I still had left over.

I grabbed my ever trusty, silicone brush and started the work of applying the paper. The bottom is where I started. It also probably doesn't matter where you start. This dried really fast. I made this piñata on our granite island and nothing stuck, but just keep that in mind as your gluing.

Over lapping is important. Just about a half an inch is ideal. You'll see as you go what is best. Try not to let it get too wet either. Remember, your bags are also from paper.

Work your way around the bag until all of the outside is covered. I continually checked to make sure my piñata was not sticking to the counter top and the spaz I am, kept wiping off the area where I was applying the glue so the clean up was a breeze.
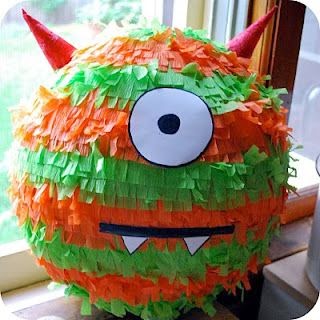
I used two square for the eyes, a longer rectangle for the...the mouth thingy and then two more skinnier rectangles for those side bits. There he was in his green glory. Mama's creeper!
Now, for the big day. Would I be able to blog about this piñata or was it going to be a bust?
The guy jumping there is my oldest and the birthday boy. He was just a little excited. As you can see, we started off with this plastic golf club because I really thought this thing wasn't going to last.

After over a dozen strikes and still no wreckage, we went for a bamboo stick. Hmmm...Still no breakage.

We got an even bigger stick AND took the blind fold off! Funny how one of the boys had on a creeper T-shirt!

Finally! LOL! I could not believe how rigid my piñata was! I may have only needed the one bag or maybe because the boys were still kind of small, but keep this in your thoughts, too.

It took them a while to break it and they had an absolute blast with the entire event. Tip: I had bags for them to put their goodies in. Think about doing this at one of your parties and remember, piñatas are not just for kids.

I hope this blog has helped. We've got plenty more party ideas on our Pinterest. This blog also contains ideas for Lego parties. Head up to the top of the blog and look for the search window on the right because we've got a few blogs over Lego. Here's another.
Thanks for your visit and good luck with that piñata!
No comments:
Post a Comment