
Welcome to The Cherry On Top.
As promised, we are back with more freebies, new templates and a couple of tutorials on how to use our most recent templates.
Read through today's blog and get an eyeful of lovely page inspiration and make sure you have all of these free templates in your stash. Then head over to our store and get our newest templates, Luv U 2 Pieces.
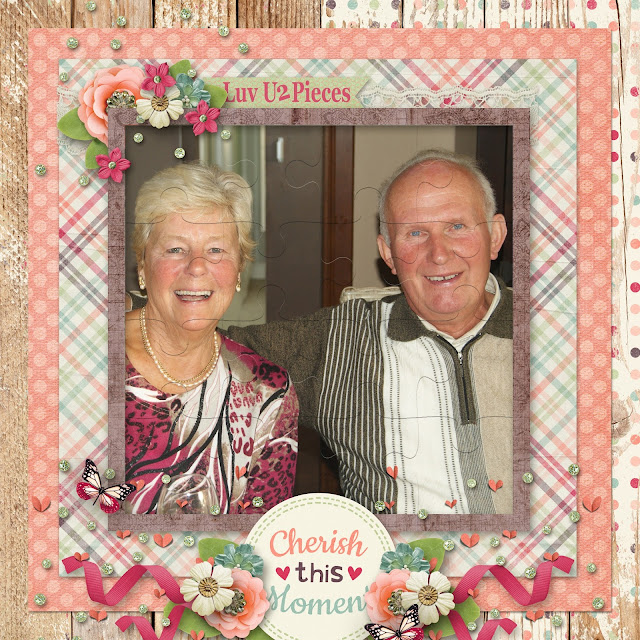
Luv U 2 Pieces templates, Memory Keeper Collection
I was a bit worried that these template might be difficult to use because I didn't merge each individual piece, but it really was easy. Yay! Keep reading to see how we did it.
Isn't this kit so fabulous?! This is Memory Keeper from the DigiChick blog hop and it's so gorgeous! If you're following us on Facebook, you'd know about this collection. We link up our fans with freebies nearly every day.

This collection is also from a free blog hop, the Digi Scrap Parade. Once again, we did inform our fans of this huge hop of gorgeousness. I hope ya got it all.

Here are our newest templates in the shop for just 2,99. They are going to look great with an autism collection as well. I have two boys with Autism and I'll be doing a page or so for that as well.

Luv U 2 Pieces templates, Serenity from Made By Keuntje
Dana has made a gorgeous page using her kit, Serenity. These colours are so fabulous and what a beauty!


I played with these puzzle pieces for a while and could not figure out a way to merge the pieces without losing the inner outline of each piece. As you can see on the third template with the 5 frames. However, it was pretty easy to get my photo in the large photo spot in the second template. I'll show you how I did it in PSE.

I chose a nice, large photo that was fairly close up and without a lot of detail. I have a feeling if you use a busy photo, it won't look as nice, but you can always try.
Make sure your photo will look good in a square shape. Then crop your photo to a near perfect square and just keep sliding it into the right piece, piece by piece and clipping it in each time with the, "create clipping mask" option as seen below.
I went in order to be sure, starting at the top, left corner and working my way to the bottom right, but it probably doesn't matter as long as you don't adjust the photo. Save it for last.

See my progress. You may notice the picture isn't fitting in perfectly, but no worries...

Once you have ALL of the pieces in place and you have NOT moved your photo at all...

Click or high light all of the photo only layers (Look at the image below) and then slide it right into place. I used my arrow keys just to be sure and it came out perfect! Yay! I thought it was going to be so much more difficult.

Here's my new Bonkers for Banners digital templates with a few examples of what you can do with them. I've got another step by step tut her, too. Yes, I have a thing for alliteration. Hehehe...

Here is how I built my banners with the new templates, Bonkers For Banners.

I opened my template in PSE and this is what it looks like. You can't get the individual layers in PSE if you try to slide it on to another page.
My paper was tiny in this huge template. You can do a few things to work with these templates. One is to go to "Image", then "resize" and then "canvas size" and change it to whatever page size you like. Usually 12 x12 inches. Then you can do your entire page on this new canvas you've created.
Another choice is to command and the - to minimise your image and then you can enlarge the paper. Check to make sure you like the result before you do all of the flags.
This way is the last way to do it. I just slid the paper I inserted over the banner I wanted to clip. You can see in the image above where there was an overlap, but once you slide it, it disappears. Yay!

Bottom row is all finished. Now, for the top layer of flags.

Use the same method of sliding them into place.

And voila! Of course, you can always merge your layers if you want the same paper in each flag. Just remove the shadow and add it again when you're finished.

I dragged my finished template into my page and embellished it there.

What a nifty cluster!

Here's another example for you using the method above.

I slid in my background papers and even adjusted each one so that they were all a little different and so the design showed up nicely in each flag.
If you want to use just one paper, you can always, delete the shadow effects, merge the layers you want the same, say the entire bottom layer or the top and clip in, adding back your shadows once you have finished.

Here's an idea of a different way to use banners.

Make your banner the feature! I simply designed a huge cluster using my banner. I placed a few elements in the background, added a frame and then duplicated my background and moved it to the layers I needed which was right behind the frame and resized it to fit in the frame. This way I can easily crop in my photo.

All we need are perhaps a few more layers and a great picture.

Aimee Harrison's June Facebook Freebie
Ah! Perfect! This is Aimee Harrison's Facebook freebie for this month, by the way.
Here are some more of our templates.

Men In Mind Templates

Last month's free template is still available for you!

Here's another great, free template from The Cherry.

Here's another recent free template found on the blog.

Definitely a crowd pleasing, free template that you can still download.
My gal Dana from Made By Keuntje has the free template.

This is a peek at tomorrow's, free hybrid printable.
How's that for some fabulous freebies?! I'll have a new, free template available on July 1st for the Love For Layout Templates Blog Hop. I know you are going to love it. Make sure you're following us on all of our social sites so ya don't miss it!
Thanks so much for giving The Cherry a little piece of your day.
Happy scrapping!